Tuesday, 26 April 2016

The Shell Seekers

Hello friends and hope this post finds you well.

You woudn't believe it's nearly the end of April ... after a balmy week weather wise last week, we seem to have had all 4 seasons in one day here with sun, rain, wind, hail and even a quick flurry of snow!

I'm bringing you my second post on behalf of Incy Wincy Designs and to recap, we'd like you to be Inspired by a Song, Book or Movie. So, make sure your creation represents your favourite and don't forget to tell us what it is!!!

We've got 2 lovely sponsors lined up for you with 2 great prizes and, I have to say, most of the DT are showcasing both sponsors because (like me) they simply couldn't choose which sponsor's images to use :oD!!!!!!!


Our first sponsor is the lovely Sami from Sami Stamps who is offering a prize pack to our first random winner.


Our second sponsor is new to us here at Incy Wincy, but has been around blogland for a while - welcome to Nikki from Melonheadz Illustrating. Nikki is offering our second random winner a bundle from her store.


For this card, I've been inspired by one of our favourite Disney songs "Under the Sea" (eldest Bambino reliably informs me this song comes from the film The Little Mermaid!) and I'm featuring one of Sami's gorgeous images. One of my best memories of this song is a number of years ago, and we'd spent a rather chilly October half term in Yorkshire sorting out my late Grandmother's house. The Bambinos had been with us, and a Disney cassette was one of the most played in the car. We were rolling along the M62 with this song playing out full blast and each of us singing one of the parts ... it was almost like the car joined in as we rocked down the road!!!!!!


My card recipe is as follows:
  • Card Base - is a pre-made 14.8cm square card base in whie
  • Papers - are by Melo Vrijhof at Pixel Scrapper Digital Scrapbooking and are from a set called Summer Splash. I've used the Multicolor Dots and Navy Splash Zentangle papers which I have layered together digitally in my word processing programme.
  • Image - is the beautifully serene Shell Mermaid 1 from the Ocean section at Sami Stamps. I have brought this girl of the ocean and her little friend to life using my Spectrum Noir Pens in the listed colours together with my Clear Spectrum Noir Sparkle Pen before die cutting it with my second largest Sizzix Framelits Fancy Labels die
    • Mermaid's SkinFS2, FS4, FS9, FS3, TN4, FS8
    • Mermaid's Hair - CT1, CT2, CT4, GB8
    • Mermaid's Top and Tail - GT1, GT2, GT3
    • Shell - CR3, PP3, CR5, DR6
    • Seahorse and Starfish - OR1, OR2, OR3
    • Sand - TN2, EB2, TN3, EB3 (I got the idea for doing the sand like this from this month's Project Class at Kit & Clowder and I'm pretty please with the way it turned out!)
  • Sentiment - is another design from Pixel Scrapper Digital Scrapbooking, this time by Marisa Lerin and it comes from the Ocean Words Kit. I die cut this using my second smallest Sizzix Framelits Ovals die and then mounted it on my card.
If you're in need of more inspiration to take part in this challenge, please head over to Incy Wincy Designs where my very talented teamies have a bevy of delights for you to savour. Don't forget to come back and link up your project which is Inspired by a Song, Book or Movie ... just be sure to tell us what your inspiration is! This challenge ends on Sunday 1st May 2016, and we'll be back with our next challenge on Monday 2nd May.

Don't forget that Incy Wincy Designs is also on Facebook and we've got a DT Call on at the moment ... all the details for that are in this post.

I would like to enter this card into the following challenges:
Hope you have a great afternoon!

Hugs, Helen x

Wednesday, 20 April 2016

All Aboard!

Good evening crafty friends!

I hope, like me, that you've been enjoying some very seasonal spring-like weather. My poor washing machine is in a state of shock as I've been doing so much laundry!

It's new challenge time at Incy Wincy Designs and this time we'd like you to be Inspired by a Song, Book or Movie. So, make sure your creation represents your favourite and don't forget to tell us what it is!!!

We've got 2 lovely sponsors lined up for you with 2 great prizes and, I have to say, most of the DT will be showcasing both sponsors because (like me) they simply couldn't choose which sponsor's images to use :oD!!!!!!!


Our first sponsor is the lovely Sami from Sami Stamps who is offering a prize pack to our first random winner.


Our second sponsor is new to us here at Incy Wincy, but has been around blogland for a while - welcome to Nikki from Melonheadz Illustrating. Nikki is offering our second random winner a bundle from her store


For this card, I have been inspired by youngest Bambino and my favourite Christmas film of all time .... The Polar Express. Both before Christmas and during the holidays it's our "snuggle up together" film! And like The Polar Express, this card keeps on surprising as it's a "Never-ending" card:

First side:


Second side:


Third side:


Fourth side:


My card recipe is as follows:

  • Card base - is white cardstock which I've cut, scored and folded, using my Ultimate Pro following this tutorial which I found on SplitCoast Stampers. I will say that the written instructions once the 2 layers are stuck together are exceedingly difficult to follow, however once I'd watched the video the folds made complete sense!
  • Papers - are from the Nordic Christmas CD-Rom, which I believe is out of stock or has been retired at Crafter's Companion. I've cut the papers to size for each panel of the card following the tutorial.
  • Images - are from the North Pole Express Set by Nikki at Melonheadz Illustrating. I wanted to use the whole set so that my never-ending card told the story of the film, so the children on side 2 are three separate images which I've put together; on side 3 I've put the elf and present together, and also Santa and his sack. These images are all pre-coloured and are also .png files, which means they have no background so can be layered onto something else straightaway. Because I wanted a small white border around each image, I have printed these separately to my papers and then fussy cut each image out.
  • Sentiments - the "Believe" sentiment is by Paulette at Create with TLC and was a goodie from the 2011 Christmas Club. The lower sentiment is computer generated using a free downloadable front called Scriptina.
So there you have it, my card inspired by my favourite film. Soon, I will be bringing you a card featuring an image by our other sponsor which has been inspired by one our my favourite songs. 

In the meantime though, do head over to Incy Wincy Designs to see how my very talented teamies have been Inspired by a Song, Book or Movie and then come back and show us your projects. Just don't forget to tell us which Song, Book or Movie you've been inspired by ... otherwise you won't be able to qualify for one of our prizes :o(

We've also got a DT Call on at the moment too - all the details are on this post. Don't forget that you don't have to have had DT experience (we all started somewhere!) we'd rather that you are a fun person who enjoys crafting!

I would like to enter this project into the following challenges:


Whatever you're up to this evening, have fun!

Hugs, Helen x

Friday, 15 April 2016

Flowers and Swirls

Hello friends! Hope this post finds you fine and dandy!


It's new challenge day at Feeling Sketchy and this time we're being sponsored by the lovely Nikky and her team from Polkadoodles who are offering a prize pack to our lucky winner.


We've got another great sketch for you by Michelle:


We're not using any sponsor images this time, so here's my take on the sketch using my stash:


Of course, never one to do things by halves I made a trio of cards ... although we needed 3 "Thank you" cards as eldest Bambino's 3 Ranger Guide Leaders left the Unit yesterday and the whole Unit went out for a celebratory meal.


My card recipes are as follows:

  • Card bases - are from white cardstock which I've cut, scored and folded to make a 9.9cm square cards
  • Design Papers - are from the Mixed Media collection from the now sadly closed Bearly Mine Designs. I've used 3 different papers from the collection
  • Flowers - are die cut using the middle and smallest petals from my Die'sire Flowers for All Occasions die. I've cut these from regular printer paper, and then (spurred on by a demo by Sheena Douglass that I saw on TV over the Easter hols) have then coloured them using Distress Inks as watercolours. The DIs I used were (from left in the above photo or in order in the photos below) Shaded Lilac & Milled Lavender; Salty Ocean & Seedless Preserves; and Vintage Photo & Milled Lavender. I finished the flowers with a clear gem in the middle. I think I need to practice this technique a bit, but as the paper was wet, they were quite easy to shape into pretty blooms!
  • Sentiment border - has been cut using my Die'sire Edgeables Lattice die. I've cut this from white cardstock and then stamped the sentiment from the Swirly String Sentiments by LOTV directly onto the cardstock.
Here are some closeups of the cards, quite simple but pretty effective:


I hope I've inspired you to play along with our sketch, but if you're in need of more inspiration my incredibly talented teamies have come up with beautiful projects ... please go to the Feeling Sketchy blog and check out the gallery!


I would like to enter the following challenges:
That's it from me ... hope you have a great weekend!

Hugs, Helen x

Tuesday, 12 April 2016

A Golden Time!

Hello all!


Hope you've had a good start to the week. Yesterday was "back to school" day for us at Casa Mia - not too many poorly peeps for the first day back, so I managed to get some admin bits and bobs tied up! 


Although I made this card last month, somehow I just didn't get around to blogging it and as a few challenges have popped up in my blogger feed I thought now would be a great time to air this beauty!


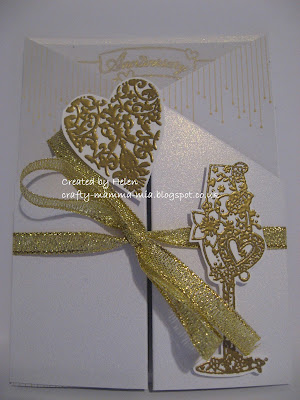
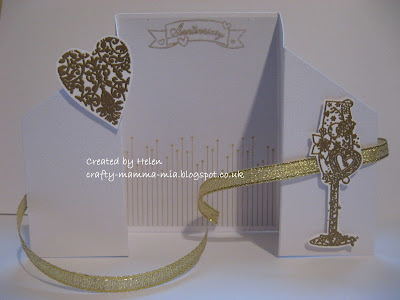
A good friend asked me to make a card celebrating her parents' Golden Wedding Anniversary, and gave me free rein to do what I wanted .... eeeeeek!!!!!!!! This was the result ... a double gatefold card:


My card recipe is as follows:

  • Images - are from freebie stamp set which came with a Cardmaking & Papercraft Magazine some time ago. I've stamped these onto Neenah Solar White cardstock using VersaMark Ink and then given them a liberal coating of gold embossing powder which I then heated. Once dry and cool, I fussy cut around the images and attached them to the front panels of my card with foam pads.


  • Sentiment - is another stamp from the Cardmaking & Papercraft Magazine set, which I've stamped directly onto the rear panel using gold ink
  • Ribbon - is from my stash and I've attached this to the outside of the rear panel of the card, and then threaded it behind the stem of the champagne flute so that it stays in place when the card is open.

Sorry this post is very "photo heavy", but I wanted to show you all the golden elements that went into this card ;o)!


I would like to enter this project into the following challenges:

That's it from me for today. I've got a few errands to run now, and then I might get to "play" a little later on. Whatever you're up to today, I hope you get some crafty time.

Hugs, 
Helen x

Wednesday, 6 April 2016

Look out ... they're behind you!!!!!!!!

Hello friends, and a very warm welcome to my newest follower, Karen Lunagirl - hope you enjoy following my crafty journey.

Regular readers will be pleased to know that me and "the automatic car" returned to the garage safe and in one piece, and I have been reunited with my own car, which didn't need any work doing - phew!!!!! Mind you, I got took some stick from PapaMia when youngest Bambino blabbed about my efforts at getting "the automatic car" onto the drive yesterday :oD!!!!!! If you're intrigued, please read yesterday's post and all will be revealed ........

After my embarrassment at nearly forgetting my brothers' Birthdays on Monday, I thought I should do something about it and maybe have some masculine cards in stock. So when a challenge reminder popped up in my blog feed and it coincided with the launch of a Facebook Challenge too, I knew what I was going to do.

Ta daaaaaaaaaaa:


My card recipe is as follows:

  • Card base - is Centura Pearl Snow White Silver which I've cut, scored and folded to make a 10.5cm x 14.8cm card with the fold at the top.
  • Embossed Strip - is a further piece of Centura Pearl Snow White Silver onto which I've embossed part of my Embossalicious Birthday Text folder, before sticking this onto my card base. 
  • Image - is by Wendy at All Dressed Up and these fun monsters are freebies on the blog! They do have some text with them already, but I masked this out using my word processing programme before printing them, as I didn't want the text showing on this card. I have brought this wobbly trio to life using my Spectrum Noir Pens in the listed colours, before hand cutting them out and attaching them to my card with foam pads to make them stand out.
    • Spider - TN3, EB3, EB8
    • Middle Monster - LY3, GB4, GB7, TN4, TN3, EB3, EB8
    • Bottom Monster - TB1, TB4, TB8, TB6, LY3, GB4, GB7, TN4
    • Grounding - IG1, IG3
  • Sentiment - is by Paulette at Create with TLC and I think this one might have been a freebie on her blog in April last year. Again, I've hand cut the sentiment out to the right size, and stuck it to my card with foam pads.

I've been inspired by and would like to enter the following challenges:
I would also like to enter the following challenge:
That's about it from me today - the Bambinos and I are off to town to have lunch at the big blue & yellow Swedish store ... yum, yum plus no washing up!

Whatever you're up to today, I hope you have fun.

Hugs, Helen x

Tuesday, 5 April 2016

Hey there Cowboy!

Good morning friends!

Hope you're well this morning - gentle hugs winging their way around for anyone who's in need of them.

My car's in the garage for it's annual service today and I've been loaned a 2 seater Smart car - looks like the bambinos will be confined to barracks until I get my car back, as I'm not sure it's legal to put one of them in the boot ;o) ! It's the first time in nearly 30 years of driving that I've found myself behind the wheel of an automatic car, and how many times did I go for the clutch and gearstick .... ? It's quite an experience, especially as I couldn't select reverse gear once home. Unknown to me, the bambinos were in the front window laughing hysterically as I struggled to get onto the drive. I managed to engage reverse properly just once, to turn in the road entrance next to our house, and then resorted to driving around the block to come back at my drive and have just driven onto it. I'm hoping that even if I can't get reverse again, the "fall" of the drive will be enough to let me come off it backwards - if not, I'll be pushing the car off and hoping that the neighbours aren't around :oD !!!!!!!!!!!!!

Anyway, enough waffle. My brothers celebrated their birthdays yesterday and I (like the bad sister I am) totally forgot, so had to quickly whip something up. Luckily, I remembered that I had this cutie from The Paper Shelter (I chose her as part of a blog challenge win earlier in the year), so I quickly printed her up.


My card recipe is as follows:

  • Card Base - is a 15cm square card in Kraft Cardstock
  • Image and Papers - are from The Adorable Cowgirl set by Veronica at The Paper Shelter. As time was of the essence, I have used the Composition which is everything you see on the card (apart from the sentiment and buttons) is ready laid out for you, which makes it oh-so-easy to whip up a great looking card in no time at all! I've inked the edge of the composition with Walnut Stain Distress Ink, just to highlight the edges.
  • Sentiment - is from the Happy Birthday Sentiments Set by Debbie at The Crafty Pad Designs. The sentiment comes as a .jpeg file, but by importing it into my word processing package, I've been able to use the "Picture Formatting" options to set the background as a transparent colour which means that I've been able to superimpose it over the tag on the composition.
  • Buttons - are from my stash, and I was thrilled to find that one of the buttons (the middle one if you're wondering) is stamped with the name of a certain "jeans" company - unless I'm mistaken they had the advert where the chap took his jeans off in the launderette .... think you will have to be of a "certain age" to remember this, or look on You Tube if you're younger ;o) !!!
So there is my quick and easy Birthday card and, if you read this Fratello Mia "the younger" Happy Birthday to you!


I have been inspired by and would like to enter this card into the following challenge:
I would also like to enter this card into the following challenges:

I'm off to get ahead on my DT makes for the next couple of weeks, and also try to catch up on some of the projects that I've complete, but not got around to blogging yet!

Hope you have a great day!

Hugs, Helen x

Monday, 4 April 2016

The Kettle's on ........

Good morning friends! Hope you are all well today. We're just starting the second week of the school hols here at Casa Mia, and I have to say that I'm feeling quite rested! 

It being the first Monday of the month, it's time to bring you the new challenge from Incy Wincy Designs and this time we'd like you to Colour Me Wonderful! We'd like to you to use your favourite colouring medium and, to be eligible for a prize and / or Top 3 place, you must state in your blog post what your favourite colouring medium is.

We've got 2 great sponsors lined up for you:

Our first sponsor is a new one to us, but Anne-Marie from AMB Illustrations has some great designs in her store; perfect papers and clip art for card making and scrapbooking! Anne-Marie is offering a great prize to our first random winner which is 5 free packs when you purchase 10 packs from her store ... that's 3 for the price of 2! Even if you aren't our winner, Anne-Marie currently has a Spring Sale on in her store - the details are on the store home page.


Our second sponsor is Heather and her team from Lacy Sunshine Stamps who are offering another prize pack to our second lucky winner.


Both of our sponsors have very kindly given the DT some images to showcase for this challenge, so here we go for something a bit different from me using my favourite Alcohol Markers and favourite Distress Inks, and featuring art work by Anne-Marie of AMB Illustrations:


Yup, I've made some ATCs!!!!!!!!!!!!!!!!!!!!!!!

Would you like an adventure ......

For this ATC, I have stuck with my usual Alcohol Markers and used them with an Alcohol Resist technique following a tutorial by Alyce at Kit and Clowder. I discovered this technique because February's Create and Learn class came with the bonus of 4 background tutorials too! Thanks for these Alyce ;o) ! My ATC recipe is as follows:

  • Base card - is Neenah Solar White Cardstock onto which I "drew" a 3½" x 2½" rectangle using my word processing programme
  • Image - of a butterfly and floral swag comes from the Garden Party Clipart Set by Anne-Marie, which I opened in my word processing programme and then layered it onto my ATC rectangle before twisting it so it sat in the corner
  • Sentiment - is called Word Art Adventure or Tea and it comes from a bundle called Sugar & Sweet by Marisa Lerin at Pixel Scrapper Digital Scrapbooking. I also added this to my ATC rectangle in an appropriate place ... and then I printed my ATC out.
  • Background - has been created using my Spectrum Noir Pens in colours PP3, PP5, HB1, BT2, BT4 which I coloured in blocks over the ATC. Once these inks were dry, I used an Alcohol Resist technique with surgical spirit and a cotton bud to created highlights. 

It's Always Tea Time .....

For this ATC, I have turned to my favourite Distress Inks, which is what springs to my mind when I'm thinking background colouring. I have used this "Smooshing" Technique before, and the contrasting colours of ink have made a lovely blended colour. My ATC recipe is as follows:

  • Base card - is Snow White Silver Centura Pearl which I've cut to a 3½" x 2½" ATC
  • Background - has been created on Watercolour Card with Distress Inks in Salty Ocean and Picked Raspberry, a water spray and a piece of acetate using a "Smooshing Technique". I patted my first ink pad on the acetate, gave it a quick spray of water and then just "smooshed" it onto my card. Whilst it was still wet, I changed to my second ink pad and using the same technique added more colour to the card. Where the pink and blue inks have merged, I've created a lovely purple colour! Once this card was dry, I cut it ¼" smaller than my ATC so that it fits nicely.
  • Image - is again from Anne-Marie's Garden Party Clipart Set; this time it's the silhouette of a teapot on a circle with a butterfly and swag, and this design comes in several colourways. I've cut this image with the second smallest Die'sire Essentials Circles Die before mounting it on my ATC.
  • Sentiment - is called It's Always Tea Time and it comes from the English Breakfast Mini Kit by Marisa Lerin at Pixel Scrapper Digital Scrapbooking. This was die cut using my second smallest Die'sire Essentials Rectangles Die before it was mounted onto my ATC.

Tea Time .....

For this ATC, I have again turned to my favourite Distress Inks and "Smooshing" Technique, this time with toning colours. My ATC recipe is as follows:
  • Base card - is Watercolour Card onto which I "smooshed" Distress Inks in Milled Lavender and Seedless Preserves. Because these colours tone rather than contrast, the blended colour is much more subtle. Once the background was dry, I cut the card to a 3½" x 2½" rectangle
  • Image - is a further image from Anne-Marie's Garden Party Clipart Set; this one is very similar to the one on the previous ATC, but the elements are not "grounded" by a shape. I cut this out using my second smallest Die'sire Essentials Scalloped Squares Die and then, to avoid it disappearing into the background, gently distressed the edges with more Seedless Preserves Distress Ink.
  • Sentiment - is another one by Marisa Lerin at Pixel Scrapper Digital Scrapbooking. This one comes from her Handwritten Kit #3 and is simply called Label Tea Time. It already had the border around it, so I simply cut this out, and attached it to my ATC.

So, I hope have inspired you to dig out your favourite colouring medium and that you'll Colour Me Wonderful over at Incy Wincy Designs this time. Don't forget to let us know what your favourite colouring medium is! However, if you're in need of further inspiration, please do check out the other great creations by my team mates. We'll be back with our next challenge on Monday 18th April 2016.


I would like to enter these projects into the following challenge:

My "Would You Like an Adventure" ATC into the following challenge:

And my "It's Always Tea Time" ATC into the following challenge:
  • Watercolor - at Make My Monday Challenge - I'm hoping that "smooshing" my distress inks with water counts as watercolouring ..... if not, please feel free to delete my entry.

Whatever you're up to this week, I hope you have fun!

Hugs, Helen x

Friday, 1 April 2016

It's coming up Daisies!

Ooooo, good morning folks and happy April Fool's Day. We're in the middle of our Easter holidays here at Casa Mia, so I'm hoping that there will be no pranks from the Bambinos! Have you been fooled today at all? I'd like to warmly welcome Kevin, my newest follower, to my blog - hope you enjoy the ramblings from Casa Mia and my crafty journey!

It's new challenge time at Feeling Sketchy and this week we are not having a sponsor ... however, we do have a $10 Gift Certificate to your favourite online scrapbooking store up for grabs!!!!!!! We've also said "Farewell" to a few of the girls who have stepped down from the team at the end of their term - sorry to see these ladies go, and I'll miss their awesome inspiration.

Here's the sketch that we're working with this week:


With no sponsor images this time, I had a great trawl through my, ahem, accumulated collection of images (I cringe every time Papa Mia says that we're running out of space on the hard disc, because some most of it's my stuff ... although I tell myself that his music doesn't help ;o)! ) and I found one that would suit this sketch perfectly, as long as I flipped the layout! So, here's my card created using the sketch:


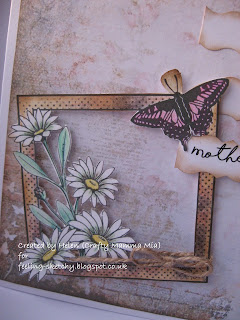
Regular readers will know that I always struggle on Mother's Day for a suitable card for my M-i-L (a retired clergy wife) as the day is known as Mothering Sunday in the church calendar - the day when servant girls were released from their duties in the big houses to return to worship at their "mother" churches and to see their own families. These girls would often pick flowers from the hedgerows on their way home, hence why little posies of spring flowers are often given to mothers in church on this day!

My card recipe is as follows:
  • Base card - is a pre-made card base in white, about 14.8cm square
  • Design Paper - is from the Mixed Media Collection by Donna at Bearly Mine Designs, now sadly closed :o( I inked around the edge of the papers using Tim Holtz Distress Ink in Vintage Photo.
  • Image - is Daisies and Butterfly Frame by Teri at ArtiDoodles (Delicious Doodles). I've brought this lovely spring scene to life using my Spectrum Noir Pencils (Original) in the listed colours, before fussy cutting the image, both inside and outside the frame. A light dusting of Vintage Photo Distress Ink softened the edges of the frame and behind the butterfly's antennae.
    • Daisies - 010, 013, 017, 046, 049, 054, 103
    • Butterfly - 041, 030, 105
    • Frame - 086, 092, 103
  • Sentiment - is computer generated using my word processing package and a free font I found on-line called Shorelines Script Bold. I cut the strips using my Tonic Studios Sculptured decorative scissors - I think these were a magazine freebie as I can't seem to find them on the internet at all. I inked around the edge of each strip using Tim Holtz Distress Ink in Vintage Photo.
  • Twine - from my stash, which is tied around the frame and finished with a bow
I hope I've encouraged you to come over to Feeling Sketchy and play along with this sketch, but if you're in need of further inspiration please do head over to the blog and check out the other wonderful creations by my teamies! Then come back and share your project using our sketch. We'll be back with our new challenge on 15/4/2016.

I would like to enter this card into the following challenges:

Have a great weekend!

Hugs, Helen x