Showing posts with label Acetate. Show all posts

Friday, 14 August 2015

I've been inspired!

Hi everyone!

Regular readers will no doubt be aware that most of my creations come about as the result of a Design Team Inspiration. However, just before we disappeared on hols I discovered and started following Hannelie's blog - I really like her card-making style, and it's one I can only aspire to being half as good at!!!!! ;o)

Anyway, one of Hannelie's DT cards popped up in my blog feed yesterday, after we'd had a visit from one of eldest Bambino's friends and her Mum reminding that us that aforementioned friend's Birthday Party is today and was Bambino OK to come? In fairness, I do vaguely remember a conversation across the sunloungers when Bambino asked if she was free on 14th August, as she and friend had been contacting each other on social media (what happened to the days when holidays were actually a break from normal life?) but the conversation and date had been well and truly parked on the back burner, i.e. completely fogotten!!!!!! Card required in a hurry, me thought ... and then Hannelie's card popped up.


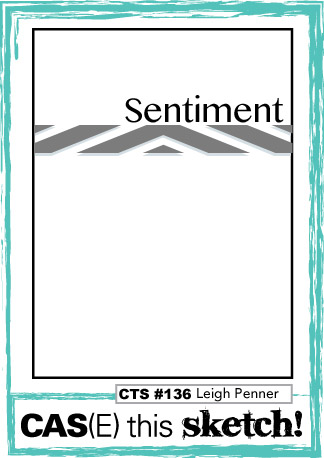
The challenge I've been inspired by is at CAS(E) this Sketch! and here is this week's sketch which is just perfect for both very quick, and the not-so-quick makes like mine!:


And here is my take on it:


My card recipe is as follows:
  • Card Base - is green Core'dinations card which I cut, scored and folded to make an 8.5cm x 12cm card, with a 3cm "flap" which is the top part of the card front. I then cut another piece of card 8.5cm x 6cm to make the bottom part of the card
  • Acetate Strip - is just regular photocopying acetate which I cut to 8.5 cm wide and with enough depth to be able to affix it to the inside of the green card. I embossed this with a Sheena Douglass embossing folder called Fabulous Florals (which was a freebie with the Spring 2014 Crafter's Inspiration Magazine) and then coloured the flowers with my Spectrum Noir Pens in PL2, PL3, PL4 and True Black before affixing the panel to the inside of the card base.
  • Butterfly - is one of the smaller butterflies in the Die'sire Essentials Beautiful Butterflies set which I cut out of dark pink Core'dinations card. I then swiped it across a Versamark Ink Pad before liberally applying Silver Pearl Embossing Powder and heating it. I then bent the butterfly's wings up, stuck it onto the card base and applied 3 small gems from my stash to it's body.
  • Sentiment - is from the stamp set that came with the Spring 2015 Crafter's Inspiration Magazine. I stamped this onto the base card with Versamark Ink before showering it with the Silver Pearl Embossing Powder and heating it - in hindsight, this gentle colour doesn't show up very well on the green!

Here's a better look at the acetate panel - I opened the card out and put it against a white background so you can see it more clearly.


It's been so grey and dismal here all day, and I really struggled to get decent photos this morning :o( Anyhow, this little card has gone to it's recipient now, and eldest Bambino is happy as I met her requirements of flowers and butterfly!

I would like to enter this card into the following challenges:
Hope you have a great weekend - we're off to Hogwarts tomorrow, well the studio tour which is eldest Bambino's own Birthday treat from July!

Hugs, Helen x

Sunday, 22 July 2012

It's gotta be love!

Hello friends!

Team A at The Crafty Pad are choosing the challenge again this week, and the lovely Joanie has set our task. She has chosen the theme of Interactive - make it move. So, your cards have to move, pop-up, spin, waterfall ... anyway you want it, as long as it moves!

We have a great prize lined up for our lucky winner this week, courtesy of our friends at Crafty Ribbons - this lovely bundle of Teddy Bear Picnic Ribbons ... do you think anyone would notice if I slipped in a entry to this comp as I think these ribbons are gorgeous?


Debbie, our lovely boss lady, has let the DT loose in The Crafty Pad Store again, and I chose the cute image called Teds in Love and here is my card:


Of course, we've gone interactive so this is a "shaker" card ... and here it is shaken, definitely not stirred!


My card recipe is as follows:
  • Base Card - made from Centura Pearl in Snow White onto which I embossed the smallest rosette shape from the "nest" on the Ultimate Pro Embossing Board Springtime Sweets and Cupcake Treats onto the top layer of my card and then cut this out to leave an aperture.
  • Design Papers - are called Colourful Polka Dots and Lots of Hearts Gray from a kit by Summer at Summertime Designs called Dance with Me. I used the same rosette shape from the "nest" on the Ultimate Pro Embossing Board Springtime Sweets and Cupcake Treats to get the aperture on the DPs, and cut these out.
  • Image - Teds in Love is just one of the many wonderful images by Debbie at Crafty Pad Designs and you can get your own copy of this lovestruck duo by clicking here! This couple came to life courtesy of my trusty Spectrum Noir Pens in the following colours:
    • Girl Bear - IG1, IG2, IG4
    • Boy Bear - IG4, IG5, IG6
    • Heart and Rose - CR10, CR11
  • Shaker Aperture Pocket - made from acetate, some thicker card (to separate my 2 layers of acetate) and fine red glitter (which I think came from a magazine earlier in the year)
  • Sentiment - computer generated using a banner and font in my word processing package

Why don't you hop over to The Crafty Pad and see the lovely projects that my "Teamies" and our awesome Guest Designer have made. Then come back and show us your Interactive creations! You've got until 8pm (BST) on Saturday 28th July 2012 to link your cards up.

I would like to enter this card into the following challenges:
Have a great weekend, and enjoy the (whispering) sunshine!

Hugs, Helen x

Monday, 14 May 2012

Busy Bees bringing a Birthday Buzz!

Hi,

It's time for a new challenge over at Lexi's Creations and this time we're challenging you to use just Black and White, plus one other colour.

This fortnight, our sponsor is the lovely Lexi at Fairy Dust Crafts who, as usual, has given the DT their choice of image to work with for this challenge. She is also offering a prize to our lucky winner.


I've tried something completely new for this card, and have made a gatefold card, but the front part of the card is made from acetate. I think it's worked quite well.

My card recipe is as follows:
  • Base Card - Centura Pearl 300gsm card in Snow White cut to form a 15cm square card base. Two pieces of Acetate cut  to 8.5cm x 15cm and scored at 1cm on the short side to give a "tab". Double sided tape was used to fix these to the reverse of my card base.
  • Design Paper - from the Strawberry Kisses CD-Rom and I tweaked the colour using the built in Colouriser to get the shades of yellow that I wanted. I got the wavy edge round it by using my new acquisition, a Clevercut paper trimmer set to a wavy line.
  • Mat & Layer Card - some plain black card I had in my stash, and 2 pieces were using a circles from the  "nest" on the Ultimate Pro Embossing Board Springtime Sweets and cupcake Treats. My TOP TIP for you here is, if there's room on your base mat & layer card, cut out your shape for under your image from that. No-one will see it as it will be hidden by your DP and it will cut down on weight (if you're posting your card) and cost (in these thrifty times) as you won't need to use another sheet! I can't claim this is my own idea ... but as, I've never seen it printed anywhere, I thought I would share it with you as this idea is too good to keep to myself!!!
  • Images - Bug 1 is by Lexi of Fairy Dust Crafts and is just one of the gorgeous images that you can find at her store. I printed out 2 images, one for the front of the card and the other (slightly larger) for the inside. These were both cut out and layered onto the black card. Once I had mounted the one inside the card, I closed the acetate on top, and mounted the smaller Bee "sandwich" directly on top of the inside one. When the card is closed, it looks like there's just one image there!   I brought these busy bees to life with my Spectrum Noir Pens in the following colours:
    • Bee - CT3, CT4, True Black
    • Outline - GG1
    • Wings and "Flying Squiggles" - Holographic Embossing Powder
    • Edge of shape - Yellow Chalk
  • Sentiment - by Paulette at  Create with TLC
    Inside the card - slightly larger image

    I hope you like this card as much as I do! Head on over to Lexi's Creations and see what the rest of the DT girls got up to using Black and White, plus one other colour. Don't forget to come back and then show us your creations! You've got until Saturday 26th May 2012 to link your cards.


    I would like to enter this card for the following challenges:
    Have a great week!

    Hugs, Helen x