Showing posts with label Theme-Summer. Show all posts

Monday, 17 June 2013

In my "itsy bitsy little polka dot bikini"!

OK ... so it's not me in my itsy bitsy little polka dot bikini you understand. I'm sure there's probably a law against that! :oD!!!!!!!!!!!


Anyway, I hope you're all well today. 


It's new challenge time at Whoopsi Daisy and this week we're giving you the option of style either Fun in the Sun or Summer ... now that's a bit of wishful thinking as our spring/summer weather here in the UK appears to be around for a couple of days and then we get some more cool and dreary weather!


As usual, Linnie is offering our lucky prize winner one sheet of images from the Whoopsi Daisy Store, unless you've used a Whoopsi Daisy Image for your project in which case you can choose two sheets of images.


Summer fun is definitely enjoying the sunshine, preferably at the beach. So for this challenge, I've used one of Linnie's past freebie images which is just perfect for my idea of summer!!!!! And here's my card which, apart from the base card, is made up entirely of freebies!:


My card recipe is as follows:

  • Base Card - is Centura Pearl in Ivory which I cut, scored and folded to make a 12cm square card.
  • Design Papers - are from the July 2012 Cardmaking & Papercraft Magazine. How perfect are these beach hut and "swimmies" papers for a summer card?
  • Image - this little one dipping her toes into the waves is by Linnie at Whoopsi Daisy and she was a freebie on Linnie's blog in March of this year. If you're not already following Linnie's blog then you really should as she sometimes offers her followers some lovely goodies! I have brought this cutie to life using my Spectrum Noir Pens and Craf-T Chalks in the following colours:
    • Skin - FS4, FS5
    • Lips - CR5
    • Hair - GB8, GB10
    • Hair Ribbons - CG3, CG4
    • Bikini - CG3, CG4, EB1
    • Sunglasses - OR3, FS6
    • Outline - BT1
    • Sky - Chalk in Light Blue
    • Sand - Chalk in Tan
    • Sea - Chalk in Turquoise with a sprinkling of White Glitter to get the effect of the sun glinting off the sea!
  • Sentiments -  is perfect for this card, and is a freebie by my very generous blogging buddy Annette. If you head over there, please be sure to let her know that I sent you!

So there you have it ... my idea of Fun in the Sun! I do hope you'll come over to Whoopsi Daisy Challenge and have a look at the wonderful creations by the other Divas and come back to show us your Summer-y creations. Don't forget that if you're using a Whoopsi Daisy image then you don't have to follow this week's theme!!! This challenge closes on Sunday 23rd June 2013.


I would like to enter this card into the following challenges:

Hope you have a great day!

Hugs, Helen x

Monday, 22 April 2013

Yummy!!!!!!!!!!!!!!


Hello again everyone!


It being Monday morning, it's time for a new challenge at  Incy Wincy Designs and this time we've got a Sketch Challenge for you. DT member Karen has come up with this lavishly layered layout for us all to use. Please feel free to flip or rotate the sketch ... as long as we can still see it's our layout, we'll be happy!


We've got 2 awesome sponsors lined up for you again this week:


Our first sponsor is the team at Digital Delights who are offering one lucky winner 3 digital images. I love the new musical set release - you could compile your own digi band with the lovely images!


Our second sponsor is our very own DT Member Nikki who runs Limited Runs Digital Stamps. Nikki has a "Freebie Friday" every week so do head over to her blog and check out her digis. 


I've always admired those who put such wonderful stitching on their multi-layered cards. However, as I put my layout together digitally, I was never going to be able to stitch this lot and get the layers right. I don't know if there are any tutorials out in Blogland showing "Digital Stitching", but I thought I would put together a brief tutorial on how I did it.

Materials:
Digital Papers (see below for details of the digi papers I'm using)
Word Processing Program on your computer - I use Microsoft Word on a PC and I'm not sure if my tutorial will work for all computers.

How to insert Digital Faux Stitching:


Choose your digi papers and a layout that you like. Layer up your papers in the order you want them to appear on your card and at the right size that you want them to be when they're printed out. My base layer here is 14cm square to go on a 15cm square card.
If you're a beginner in layering digital images, I can recommend that you follow this tutorial by my bloggin' buddy Annette who explains the "How to ..." very clearly! Once you've got your papers layered up, with a picture border as the faux matting layer....


Choose the "Insert" tab and select "Shapes". From that drop down menu, choose the "Rectangles" shape and click on it. 


Draw a rectangle (or whatever shape you need) inside the shape of your first paper layer. Here you can see a yellow rectangle with a red border on top of my blue paper, which is the top layer of my stack. How close you put the rectangle to the edges of your paper depends on how close you want the stitching to be to the edge of the paper.


Click on the "Format" Tab and click the "Shape Fill" option; then click on "No Fill". As you can see in the picture above, the yellow rectangle has gone, and the blue DP is visible with a red border on the inside edge.


Click on the "Format" tab again but this time click on the "Shape Outline" option - you can choose how heavy your line is by clicking on the "Weight" option and then choosing one of the preset options. Here I've chosen 2¼ points.


Go back and click on the "Format" tab and click on the "Shape Outline" option again. This time select the "Dashes" option and you can choose from the pop-out box of options what style you want your "stitching" to be. Here I've selected the "Long Dash Dot Dot" line. If you look closely at the blue paper, you can see that our choice of "stitching" is already showing on it.


Now to colour the "stitching" - click on the "Format" tab and click on the "Shape Outline" option once more. This time, choose a colour from the colour palette which is shown - I've gone for the same mid-grey shade to match my faux matting layer. Again, look closely at the blue paper, and you can see that the "stitching" lines are now in our chosen colour.


I like to group the paper and the "stitching" line see through shape together - that way, if they get moved they will stick together! Left mouse click on the "stitching" line and then hold down the Shift key. Keeping this key depressed Right mouse click on the blue digi paper - this should bring up a menu. (If your 2 shapes are very close together, this might take several goes to get right!) Use the mouse to highlight the "Group" option. This should bring out a little pop-out box and you can now release the Shift key. Select the "Group" option and your "stitching" is now on top of the blue digi paper.


I like to put this layer at the back, so that I can work on all the other layers. So, right mouse click on the blue digi paper, use your mouse to select the "Send to Back" option. This will generate another pop-out box, and you will need to use your mouse to select the "Send to Back" option from this box.


You can see that the blue paper has now disappeared leaving the formatting outline on top of the paper stack. This will disappear as soon as click away from the papers.


For each remaining layer of digi paper that you want stitching on, follow the above instructions and then send that layer to the back. By the time the bottom layer (here the stripy paper) has got it's faux stitching and been sent to the back, the stack of papers is all in the right order again, as shown in the picture above. All that remains to be done is to print it out and attach it to your card base.


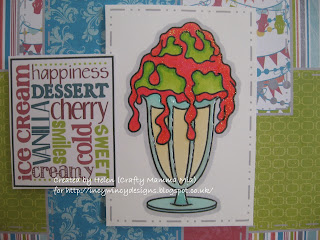
Nikki very kindly gave each DT member their choice of one image to showcase, so here is my card featuring one of Nikki's Limited Runs Digital Stamps and the layered and "stitched" paper stack shown in the tutorial with two extra layers physically added for the image and the sentiment:


My card recipe is as follows:

  • Base Card - made from Centura Pearl in Snow White which I cut, scored and folded to make a 15cm square card.
  • Design Papers - are all by Summer at Summertime Designs and they come from her new kit Patio Picnic. From the bottom layer, the papers I've used are called Stripes, Green Patterned, Pink Flourish, Pendant and Blue Flourish. I have digitally matted and layered these papers together using a dove grey outline in my word processing programme, so there will be little bulk to this card. Using the tutorial process, I also used to my word processing program to insert faux stitching on every layer in the same dove grey colour. 
  • Image - this mouthwatering image is called Ice Cream Sundae and it has been drawn by Nikki at Limited Runs Digital Stamps. I brought the sundae to life using my Spectrum Noir Pens in the listed colours before slicking a layer of Glossy Accents over the Sundae Glass, and sprinkling a layer of Holographic Embossing Powder over the sauce and heat setting it:

    • Sundae Glass - BT2, BT4
    • Ice Creams - EB1, EB2, CG2, CG4
    • Sauce - DR1, DR3
    • Outline - IG2
  • Sentiment - this Subway Art style sentiment is by Paulette at Create with TLC. I got this from Paulette in February 2012 - I can't remember whether it was a blog freebie, or whether it was a Scavenger Hunt prize ... sorry! Whichever it was, it's perfect for this card!


I do hope you'll head over to Incy Wincy Designs this week and see the other wonderful layouts from my very talented team-mates and Valou who is still with us as our Guest Designer. Then come back and show us your creations which follow our Sketch. This challenge closes on Sunday 28th April.


I would like to enter this card into the following challenges:

  • Just Add Glitter Recipe Swap at Catered Crop
  • Challenge 59 - Food Glorious Food at Little Miss Muffet
  • Challenge 99 - Say It Isn't Sew (No Machine Sewing) at Top Tip Tuesday My tip for you this time is how to put digital faux stitching on your card using the Tutorial above

Hope you have a great week.

Hugs, Helen x


Sunday, 8 July 2012

Beach Baby

Good morning friends and welcome to another week with The Crafty Pad! It's Team A's turn on the challenge and this week it's the lovely Ms Pauline who has chosen the theme of At The Seaside. We would love to see beach huts, buckets & spades, ice cream - anything to do with the seaside on your cards this week. We have two great sponsors lined up for you this week.


Letraset are offering one lucky winner a pack of Mid-Tone Promarkers and our second lucky winner will receive 3 Digital Images from The Stamping Boutique.


Tracey Malnofski has also kindly supplied the digital images for the DT to use this week, just to give you a taste of what you can find in her store. I have chosen this gorgeous image called, appropriately enough, Beach Baby.


For my layout inspiration I've followed the current sketch at Tuesday Morning Sketches, which I think is a totally gorgeous CAS style. If you've been following me for a while, you'll know that frilly and fussy doesn't sit easily with me - I'm rarely happy with my fancy creations!
My card recipe is as follows:
  • Base Card - made from Centura Pearl in Snow White  onto which I embossed the largest rosette shape from the "nest" on the Ultimate Pro Embossing Board Springtime Sweets and Cupcake Treats. I folded the card to make a hinge on the side, and 2 "feet" at the bottom and then cut round the embossed shape.
  • Design Papers - from a 6x6 paper stack called Beach Babe by Fancy Pants Designs, which was a magazine freebie, possibly with Cardmaking & Papercraft last month ...I think!. I used the largest circle from the "nest" on the Ultimate Pro Embossing Board Springtime Sweets and Cupcake Treats to emboss circles on the DPs, and then cut them to shape.
  • Image - Beach Baby is just one of the many fantastic images by Tracey at The Stamping Boutique and you can get your own copy of this cutie by clicking here! I defy you to pay a visit to the store and come away empty handed! This little sand baby came to life courtesy of my Spectrum Noir Pens in the following colours:
    • Sand - CT1, CT2, CT3, CT4
    • Sea - BT2, BT4
    • Sunsuit - BP1, BP2, CG2
    • Skin - FS2, FS3
    • Hair - TN4, TN5, TN7
    • Flag & Spade - BP6
    • Sky - light blue chalk
  • Thread - White waxed Linen thread from my stash, which I then coloured using my Spectrum Noir Pen in shade BP6


Why don't you hop over to The Crafty Pad and see the great cards from this week's awesome Guest Designer and my "Talented Teamies" - I'm sure their creations will transport you to warmer climes, away from the dreary British "summer" ;o)!

Make sure you then come back and show us your At the Seaside creations! You've got until 8pm (BST) on Saturday 14th July 2012 to link your cards up. I know all the DT girls really love coming round your blogs and seeing your cards.


With a little help from the girls at Feline Playful, I would like to enter this card into the following challenges:
Hope you have a great Sunday! Happy Crafting!

Hugs, Helen x

Monday, 25 June 2012

Oh I do like to be beside the seaside .... !

Good morning my crafty friends and welcome to Diana, my newest follower!
It's time for a new new challenge again at Lexi's Creations and I do so hope that this fortnight's challenge brings the nice weather back to the UK - this morning is looking promising here! This time, we're asking you to show us At The Beach.


The fabby team at at Cropstop are sponsoring our challenge again this week and they're offering our lucky winner a $15 Gift Certificate. Here is a little about them:
"If you’re passionate about paper-crafting whether it be scrapbooking your memories, making cards or altered art, CropStop is your one-stop solution. We offer an extensive selection of dies, embossing folders, inks, stamps and punches by all the popular manufacturers and the CropStop die and embossing folder storage solutions Pocketz Pages™ to keep everything organized. Our selection of embellishments and adhesives is continually expanding and we are excited to be the home of the colorful Ribbon Candy™. CropStop ships internationally as well as domestic. Our personalized customer service is only one of our strengths. Call or come visit us at www.CropStop.com and see what’s new in the world of paper-crafting."
Lexi at Fairy Dust Crafts has given every DT member free choice on what image they'd like to have on their cards. Here is the card I've made to share with you today:

My inspiration for this card layout came from Diane, one of my DT friends over at The Crafty Pad who made an awesome diorama card for our challenge on 10th June. So I had a play too in order to come up with this beach scene!


For each layer my card recipe is as follows:

Front Layer

·         Base Card - made from 160gsm white card, cut and folded to a 13cm by 8.5cm rectangle (finished size).
·         Aperture - I embossed an oval shape onto the card using the largest oval on my Ultimate Pro Embossing Board Snowman Delight and Candlelight, and cut this out.
·         Design Paper - is called Sand Hills, and is part of a kit called "FlipFlop-sicles" by Summer at Summertime Designs. Once I had fixed the paper to the card, I then cut round the aperture so you can still peek through it!
·         Image - is called Beach Ball Element and is also from the same "FlipFlop-sicles" kit.
·         Sentiment - is by Debbie at The Crafty Pad Designs
·         Sky - light blue chalk, having made a "mask" using the clip art on my computer to make the right sized cloud shape, which I then printed onto a sticky note and cut round. I then stuck the cloud mask at various places in the sky and simply dabbed my chalk around, leaving white fluffy clouds in a pale blue sky!


Middle Layer
  • Base Card - made from 160gsm white card, cut and folded to a 13cm by 8.5cm rectangle (finished size).
  • Aperture - I embossed an oval shape onto the card using the smallest oval on my Ultimate Pro Embossing Board, and cut this out.
  • Sea - is paper-pieced from Blue Grungy Paper (from the "FlipFlop-sicles" kit) using the sea on my main image as a "template". I then cut this out and offset the waves from the main image so it gives the impression of moving waves!
  • Water Droplets - dabbed in using my Spectrum Noir Pen in TB5
  • Sky - light blue chalk and my "mask"

Rear Layer
  • Base Card - made from Neenah 216gsm Solar White Card, cut and folded to a 13cm by 8.5cm rectangle (finished size).
  • Image - This gorgeous fluffy water baby is Splashing Fun Ollie Duck and he has been created by the lovely Lexi at Fairy Dust Crafts - you can find Ollie and a whole host of other great images by clicking the link and heading over to Lexi's store. I brought Ollie to life using my Spectrum Noir Pens in the following colours:
    • Feathers - GB3, GB4, GB5
    • Bill - OR1
    • Rubber Ring - CG4, CR11, IG2
    • Snorkel & Goggles - CG1, FL3, IG1
    • Water Droplets - TB6
    • Outline - IG2
  • Sky - Chalk in Royal Blue and Light Blue and my cloud "mask"
  • Sea - is paper-pieced from Blue Grungy Paper (from the "FlipFlop-sicles" kit).

This card is for my niece who celebrated her first Birthday last Thursday - according to her Dad she just loves Ollie!!!!!

Head on over to Lexi's Creations and see what my team mates have created At The Beach. Don't forget to come back and then show us your beach themed creations! You've got until Saturday 7th July 2012 to link your cards up.

I would like to enter this card for the following challenges: 
Have a crafty week!

Hugs, Helen x

Tuesday, 28 June 2011

Hi and Welcome!

Welcome to my brand new blog. As you will gather, I'm not very good with technology, but bear with me ... I may get better!
I wanted to show you a card that I'm entering into a couple of blog challenges:
I made this card using a Centura Pearl in cream folded to A5. I then cut two squares from burgundy flocked butterfly paper (an Anna Griffin paper that I bought from Hobbycraft) and layered these onto my card. I used a strip of black organdie ribbon (also from Hobbycraft) to go horizontally across the card underneath the topper. I sized the topper (this lovely picture of a lady from times gone by on the beach, which I downloaded from The Graphics Fairy) to suit the card size and the butterfly 'patches' and then printed this onto cream 160gsm card. Having cut the topper out, I then mounted it over the ribbon and patches. I finished the card by making a bow from the black organdie ribbon bow (and added it to the top of the picture) and used a silver peel off sentiment, adding a silver 'squiggle' underneath it.

I am entering this card into the following challenges:
  • June Monthly Challenge "Vintage" on Card Making World
  • Challenge 13 "Here Comes Summer" on Crafter's Companion
Hope you like it!