Showing posts with label Technique-Heat Embossing. Show all posts

Sunday, 15 April 2018

Happy 40th!

Good afternoon crafty friends - hope you have had a wonderful weekend!

It's been nice to see the sunshine here at Casa Mia, after the grey weather of the last couple of weeks ... let's hope it stays!


It's new challenge time at All Dressed Up Challenges and we're also introducing our new Dressy Girls following the recent DT Call - it wasn't an easy choice, but we hope that everyone will find inspiration from our new ladies who have made some fabulous creations! As usual, our challenge is Anything Goes with an All Dressed Up Image. Not got any All Dressed Up images? Wendy has plenty of gorgeous images available in the All Dressed Up Etsy Store and has also very generously provided some freebies here - please send your friends over to ADU for the freebies though, to make sure they're available for other crafters to share!


One of our friends celebrated her 40th Birthday last Sunday, and her husband threw a surprise party for her to which we were invited. This wonderful image was just perfect to mark her special day!


My card recipe is as follows:
  • Card base - is Centura Pearl Snow White Silver which I have cut, scored and folded to make a 15cm square card
  • Mat - is a sheet of teal coloured Core'dinations Card which I cut to 14.5cm square
  • Image - is Happy 40th by Wendy at All Dressed Up (which I have printed onto a 14cm square panel of Neenah Solar White Cardstock.) There are 3 digis in this great value set (the others are Happy 50th and Happy 60th) and not only are they great to help celebrate those big '0' birthdays but they would be fab for big anniversaries too! I can just see this in ruby colours for 40th or gold to celebrate a Golden Wedding Anniversary! Anyway, as my project is for a birthday, I have gone for different coloured flowers using my Spectrum Noir Marker Pens. As I have also followed the Elements of Nature Class by Alyce at Kit & Clowder to colour the Leaves, Rose, Poppies and Gerberas, and then used the Hydrangea tutorial for colouring the small purple flowers, I am unable to share my colour combinations with you. However, you will have to trust me when I say that you will not regret purchasing this class if you wish to improve your colouring ... 😃 The 4 butterflies were coloured using VB1, VB2 & VB3 with a tiny pearl on each for the head. The sentiment was embossed using a VersaMark Watermark Pen and silver embossing powder, although I think I would have been better embossing in smaller portions to get a more even finish.
  • Frame - around the heart wreath, has been cut using my Die'sire Classiques Lace Corner dies. For the two upper portions, I cut around the wreath using a sharp craft knife so that these parts would sit on top of the die (like an "Out of the Box" Technique) and not be cut, and would then nestle back down into place once the die (and negative parts) was removed.
I hope I have inspired you to come over to All Dressed Up and play along with this challenge. If you're in need of further inspiration please head over to the blog and check out the other gorgeous creations by my Dressy Teamies and also help us to welcome our new Dressy Girls! Then come back and show us your Anything Goes with an All Dressed Up Image. Don't forget that for more chances to win some of Wendy's gorgeous images, our Facebook Dressy Teamies have their own challenge running until the end of February and their theme this month is Flora and / or Fauna.

I would like to enter this card into the following challenge:
Well, it's back to work for me tomorrow after the Easter break - I hope you have a great week!

Hugs, Helen x

Tuesday, 22 November 2016

And Now For Something Completely Different !

And readers of a certain age may well, like me, be humming the theme tune to Monty Python's Flying Circus at this point!

Good evening my crafty friends and hope that this post finds you well.

It's the second showcase of this month's New Release images at All Dressed Up and this time Wendy has outdone herself with 4 fantastic images just begging to go on your Christmas projects! If you missed the first DT showcase of the new images then click here to see the wonderful inspiration we have lined up for you.


I'm thrilled to share Christmas Snow Globe (top left), Christmas Tree Fairy (top right), My First Christmas (bottom left) and the sensational Party Season (bottom right) and just click on the image name to be taken straight to it in the shop. I can tell you that a high number of the DT girls were falling over themselves to play with the gorgeous party girlies first 😉 !!!!!!

I was asked to showcase Christmas Snow Globe and I thought I could do a shaker card but I didn't want to detract from the pretty card Nancy did. Then I thought I could do a rocker card but that didn't look like it was going to work out properly. So then Mr Mojo went into complete overdrive and I found myself unwittingly heading towards my Shrinkles Plastic and this Tree Ornament was the result:


My ornament recipe is as follows:
  • Base - is a sheet of Shrinkles Plastic cut to around 13 x 14 cm which I had calculated using my Shrinkles Magic Ruler (my tutorial is here which gives some tips on how to make and use it) would leave me with a finished project size of 4.5 x 5 cm once the plastic had shrunk in the oven
  • Image - is Christmas Snow Globe by Wendy at All Dressed Up Digital Stamps which I printed out at about 12cm and then I used masking tape to fasten my square of plastic over the printed image. I then used my Spectrum Noir Pens in the listed colours to bring this fawn and her clearing to life, using several techniques in the November 2016 Monthly Markers Colouring Class at Kit and Clowder. I cut a narrow border around the snowglobe, punched a hole in the top to hang it and then "cooked" my plastic in the oven to shrink it as per the manufacturer's instructions
    • Fawn - EB2, EB3, EB5, True Black
    • Flower Spray - CR8, CR11, DG4
    • Trees - DG2, CG4, DG3, DG4, TN4, TN7, TN9 
    • Snow - IG1, TB1, TB4
    • Snowflakes - TB1 and Glitter Embossing Powder
    • Star - LY3
    • Outlines - True Black
  • Ribbon - is from my stash
I hope I have inspired by to head over to the shop and treat yourself to a new Christmas-y image. Don't forget that once you've coloured your image up you can enter it into the Celebrations with an All Dressed Up Image Challenge over on the All Dressed Up Facebook Page (until 30th November 2016) and/or enter it into the current Blog challenge, Anything Goes with an All Dressed Up Image (running until 14th December 2016).

Can't wait to see your creations with these fabulous foursome!


I would like to enter this decoration into the following challenges:

Hope you have a great week.

Hugs, Helen x


Friday, 1 July 2016

The Butterflies and the Bee .... !

Good morning crafty friends, and no this is not going to be a biology lesson ;o) !!!!!!

Hope that this post finds you well. Given that it is now the 1st of July, can anyone in the Northern Hemisphere please explain where summer has disappeared to? I know that the tennis at Wimbledon has started and that this usually heralds rain, but I've resorted to jeans and jumpers again this week. Much more and the heating will have to go back on!

It's new challenge time at Feeling Sketchy and we've got another fabby sketch in store for you. 


We've also got a fabby sponsor and this time it's the lovely Jodie from Bugaboo Digital Stamps and she'll be offering a prize pack to our lucky winner. Having been lucky enough to have had a couple of recent wins on challenges that Jodie has sponsored, I know that the prizes she offers are great! And don't forget that even if you don't win the main prize, everyone's a winner with Bugaboo's legendary "Friday Freebies"!

So, here goes with the sketch created as usual by Michelle:

And here's my take on it, using images from Bugaboo Digital Stamps:
My card recipe is as follows:
  • Card base - is made from Centura Pearl Snow White Silver which I cut, scored and folded to make a 12.5cm x 15cm card base. To make sure the card base shape matched the die cut shapes, I scanned the die and then increase the size to suit. I printed out the resulting shape and used this as a template to cut my card base with a craft knife and ruler.
  • Mat & Layer - is made from plain black card and I created a further template to ensure this was the correct size by measuring in 0.5cm on each edge of the card base template and then ruling the lines. I cut along these lines, and used the resulting shape as my template.

  • Images - are the lovely Rose Block Trio by Jodie at Bugaboo Digital Stamps. These come in monochrome and are set into squares. However, I wanted to use these pretty Diamond Press Stitched Hexagon Dies which came with Crafter's Inspiration Magazine Issue 10, so I increased the size of the blocks. Once the roses had been die cut, I laid them out in this lovely offset pattern. I then stamped the sweet little bumble bee (from the stamp set included with Crafter's Inspiration Magazine Issue 10) twice in Versamark Ink (the second time I masked the little bee, so it's only the trail that shows) and then heat embossed this using Silver Embossing Powder.
  • Flowers - are die cut from Centura Pearl Snow White Silver using the middle and smallest dies in the Die'sire Essentials Flowers for all Occasions set. I die cut these and then ran them back through my machine to emboss the details. Before removing the flowers from the dies, I applied my Versamark Pen to the raised areas, then quickly removed each flower from the die, applied Silver Embossing Powder and heated to highlight the centre of the petals.
  • Butterfly - is also die cut from Centura Pearl Snow White Silver using a die from the Die'sire Essentials Beautiful Butterflies set. The silver accents were added exactly the same way as for the flowers.
  • Sentiment - comes from the Swirly String Sentiments set at Lili of the Valley. Again, this was stamped in Versamark Ink and heat embossed this using Silver Embossing Powder.

I hope that I've inspired you to have a go with this sketch but if you're in need of any further inspiration then please come over to Feeling Sketchy and have a peek at the fabby creations made by my clever teamies. Then come back and show us your take on our sketch - don't forget, you can change the shapes, rotate the sketch etc. ... we just need to be able to see that our sketch was the inspiration for your project! We'll be back with our next challenge on 15th July 2016.

I'm off to the Year 11 Prom this evening straight from school as our Staff Band is playing. But I'll be back in the morning to link up to these challenges:
  • Anything Goes with the Additional Topping of Birds, Bees or Butterflies at Seize the Birthday - I've got some butterflies and one bee on my project
  • Challenge #305 - Anything Goes at 4 Crafty Chicks
  • Challenge #148 - All about the Flowers at Creative Knockouts


Hope you have a lovely weekend!

Hugs, Helen x

Tuesday, 12 April 2016

A Golden Time!

Hello all!


Hope you've had a good start to the week. Yesterday was "back to school" day for us at Casa Mia - not too many poorly peeps for the first day back, so I managed to get some admin bits and bobs tied up! 


Although I made this card last month, somehow I just didn't get around to blogging it and as a few challenges have popped up in my blogger feed I thought now would be a great time to air this beauty!


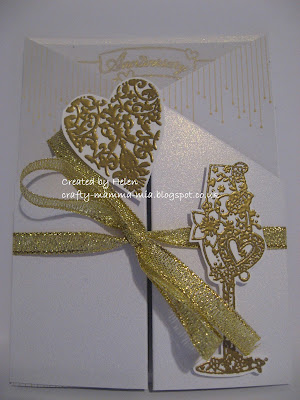
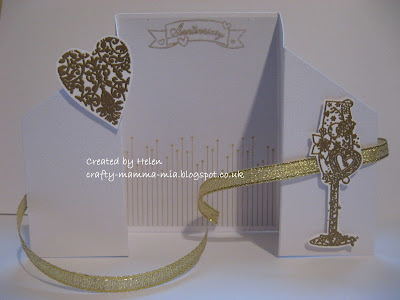
A good friend asked me to make a card celebrating her parents' Golden Wedding Anniversary, and gave me free rein to do what I wanted .... eeeeeek!!!!!!!! This was the result ... a double gatefold card:


My card recipe is as follows:

  • Images - are from freebie stamp set which came with a Cardmaking & Papercraft Magazine some time ago. I've stamped these onto Neenah Solar White cardstock using VersaMark Ink and then given them a liberal coating of gold embossing powder which I then heated. Once dry and cool, I fussy cut around the images and attached them to the front panels of my card with foam pads.


  • Sentiment - is another stamp from the Cardmaking & Papercraft Magazine set, which I've stamped directly onto the rear panel using gold ink
  • Ribbon - is from my stash and I've attached this to the outside of the rear panel of the card, and then threaded it behind the stem of the champagne flute so that it stays in place when the card is open.

Sorry this post is very "photo heavy", but I wanted to show you all the golden elements that went into this card ;o)!


I would like to enter this project into the following challenges:

That's it from me for today. I've got a few errands to run now, and then I might get to "play" a little later on. Whatever you're up to today, I hope you get some crafty time.

Hugs, 
Helen x

Friday, 14 August 2015

I've been inspired!

Hi everyone!

Regular readers will no doubt be aware that most of my creations come about as the result of a Design Team Inspiration. However, just before we disappeared on hols I discovered and started following Hannelie's blog - I really like her card-making style, and it's one I can only aspire to being half as good at!!!!! ;o)

Anyway, one of Hannelie's DT cards popped up in my blog feed yesterday, after we'd had a visit from one of eldest Bambino's friends and her Mum reminding that us that aforementioned friend's Birthday Party is today and was Bambino OK to come? In fairness, I do vaguely remember a conversation across the sunloungers when Bambino asked if she was free on 14th August, as she and friend had been contacting each other on social media (what happened to the days when holidays were actually a break from normal life?) but the conversation and date had been well and truly parked on the back burner, i.e. completely fogotten!!!!!! Card required in a hurry, me thought ... and then Hannelie's card popped up.


The challenge I've been inspired by is at CAS(E) this Sketch! and here is this week's sketch which is just perfect for both very quick, and the not-so-quick makes like mine!:


And here is my take on it:


My card recipe is as follows:
  • Card Base - is green Core'dinations card which I cut, scored and folded to make an 8.5cm x 12cm card, with a 3cm "flap" which is the top part of the card front. I then cut another piece of card 8.5cm x 6cm to make the bottom part of the card
  • Acetate Strip - is just regular photocopying acetate which I cut to 8.5 cm wide and with enough depth to be able to affix it to the inside of the green card. I embossed this with a Sheena Douglass embossing folder called Fabulous Florals (which was a freebie with the Spring 2014 Crafter's Inspiration Magazine) and then coloured the flowers with my Spectrum Noir Pens in PL2, PL3, PL4 and True Black before affixing the panel to the inside of the card base.
  • Butterfly - is one of the smaller butterflies in the Die'sire Essentials Beautiful Butterflies set which I cut out of dark pink Core'dinations card. I then swiped it across a Versamark Ink Pad before liberally applying Silver Pearl Embossing Powder and heating it. I then bent the butterfly's wings up, stuck it onto the card base and applied 3 small gems from my stash to it's body.
  • Sentiment - is from the stamp set that came with the Spring 2015 Crafter's Inspiration Magazine. I stamped this onto the base card with Versamark Ink before showering it with the Silver Pearl Embossing Powder and heating it - in hindsight, this gentle colour doesn't show up very well on the green!

Here's a better look at the acetate panel - I opened the card out and put it against a white background so you can see it more clearly.


It's been so grey and dismal here all day, and I really struggled to get decent photos this morning :o( Anyhow, this little card has gone to it's recipient now, and eldest Bambino is happy as I met her requirements of flowers and butterfly!

I would like to enter this card into the following challenges:
Hope you have a great weekend - we're off to Hogwarts tomorrow, well the studio tour which is eldest Bambino's own Birthday treat from July!

Hugs, Helen x

Tuesday, 16 June 2015

It's Tag Time!

Hope everyone's well today crafty hugs winging their way around for those who need them!


It's new challenge time at Incy Wincy Designs and this week we're after your projects featuring tags as our title is "Tag ... You're It!". We're delighted to also be welcoming our former teamie Karen back to the team! And we also have a bonus Blog Hop for you! It's going to be a very busy week me thinks!

Our sponsor this week is our very own Nikki from Limited Runs Digital Stamps who is offering this week's lucky winner a prize package of 3 digital stamps. However, Nikki is going to increase that prize pack to 5 digital stamps IF you use Nikki's monthly freebie which this month is the super-cute Bird Brain

Onto the Bonus Blog Hop!!!

If you pop around and leave every DT member a little love on their Blog, there will be a winner pulled from each DT blog from all the comments left to win a digi of your choice. The more comments you leave, the better your odds are. You might score and win on more than one blog, so pop over and check out all the girls blogs and say "Hi!". A list of my Incy Wincy Teamies is in my left sidebar, but please note that Heather and Jenny are away from blogging at the mo an are therefore not participating in this blog hop.


Nikki has very kindly given every DT member their choice of image to use for this challenge, but I've decided to go with a freebie which Nikki had Limited Runs Digital Stamps in December 2013 and I've made a Gift Tag:


My Tag recipe is as follows:


  • Tag - is made from black card which I embossed using one of the nested tag shapes on the Ultimate Pro Embossing Board Springtime Sweets and Cupcake Treats before cutting the shape out and re-embossing to ensure a neat and "stand out" edge
  • Image - is by Nikki at Limited Runs Digital Stamps and I don't think this Santa actually has a name, and I can't find him in the store. However, there are a number of other Santas to choose from. I brought this Santa to life using my Spectrum Noir Pens in the listed colours before fussy cutting Santa out.
  • Sentiment - is from the Happy Holidays Vintage Stamp Collection, which was a magazine freebie. I've stamped this directly onto my tag in Versamark Ink, coated it with silver embossing powder and heated it.
  • Ribbon - is recycled from a previous Christmas gift ... I found this lurking at the bottom of my handbag and, if memory serves me right, it came from a work Secret Santa Gift Swap! It's threaded through a snowflake hole punch

Do come over to Incy Wincy Designs and start the blog hop by visiting all the other DT girls and don't forget to leave them all a comment on their tags and you could be a lucky winner! Then get crafting and show us your projects with Tags and you're in with a chance of winning our prize package and/or making our Top 3! This challenge finishes on Sunday 21st June.

I would like to enter this tag in the following challenges:
Hope you have a great rest of the day!

Hugs, Helen x


Monday, 25 May 2015

Sunflower Border

Good Morning my crafty friends and a warm welcome  to Larissa who is my newest follower - hope you enjoy my madcap crafting journey!!!!


If you're in the UK, I do hope you're enjoying the Bank Holiday weekend. From having not alot planned for this weekend, PapaMia and I decided to re-jig one of the borders in the garden, so we had a garden centre trip and then a planting afternoon yesterday. Not sure what's on the agenda for today, but I might be able to fit in a little extra "me" time ... aka crafting!!!!!!!


Is anyone else struggling with Blogger at the mo? Whenever I pull up posts, I can't seem to see all the pictures in that post and it's taking me several goes to get my own photos into a post. Any of you lovely computer-literate peeps out there got any suggestions as to how I can rectify this?


Anyway, whining over! It's new challenge time at Incy Wincy Designs and this week we'd like you to either go for All or Nothing! This means either lots of layers or no layers at all ... I bet regular readers can guess which I've gone for before they even look at my card! ;o)


We're being sponsored this week by the lovely Sandy at Scribbles Designs who is offering $10 of digital images to our lucky winner this week. Here's a little about Sandy and her work:
And welcome to Sandy's world of her funky imagination and quirky characters.Sandy's has had a pencil in her hand since she was "knee-high to a grasshopper" and started on her artistic journey with her first family ball & stick figures portrait at age 3. We'll have to find the piece of work in the family history trunk and post it...
Back to the regular scheduled program! Sandy has loved art, drawing, water coloring and doodling for many years... and with the digital image world she can now share it with all of you. Brrr (Penguin) was her first main character and her other quirky images followed not long after. We hope you enjoy the enduring images and look around and add Sandy's images to your digital stamp collections...
If you head over to Sandy's store, you'll also find that she sometimes has a Friday freebie up for grabs too ... :o)


Sandy has very kindly given the DT some images to use this week for inspiration, but I have gone back through my digi files as I was lucky enough to win a couple of Sandy's images last year and, shame on me (blushing wildly here!) they haven't seen the light of day, or the ink of my printer! So here goes, my one layer card (did you guess right?) featuring one of Sandy's pretty images:


This card has already gone to eldest bambino's Form Tutor as the students are now on reduced timetable/study leave due to their GCSE exams, so I'm very safe in posting it here today. Who knows, the Tutor might even take a peek ... let me know Miss R.!


My card recipe is as follows:
  • Base card - is Neenah Solar White Card, onto which I printed my design, scored as an A4 tri-fold card and then cut the last third to leave a DL sized card when folded.
  • Image - is #603 - Sunflowers 3 drawn by Sandy at Scribbles Designs. I printed this directly onto my base card and then brought it all to life using my Spectrum Noir Pencils in the listed shades following this technique tutorial by Nicky over at the Spectrum Noir Website - thanks for a great tute Nicky, I finally feel as though I've done an image some justice with my pencils!
    • Sunflowers - 012, 018, 023, 093
    • Leaves - 012, 056, 047, 023, 093
    • Sky - 067, 023
    • Tendrils and dots - Gold Gel Pen
  • Sentiment - is a clear stamp from Hobbycraft although it no longer appears on their website. I stamped this in Versamark ink, sprinkled with some gold embossing powder and then heated it.

I hope I've inspired you to have a go with no layers, but don't forget to pop over to Incy Wincy Designs and see which of my extremely talented teamies have gone for All or Nothing! Then come back and show us your creations as we love visiting you - this challenge ends on Sunday 31st May 2015.


I would like to enter this card into the following challenges:
We're on half term now for the rest of the week, so a chance to recharge my batteries for the next half term ... if you're on holiday this week too, I hope you enjoy it!

Until next time ....

Hugs, Helen x


Monday, 6 January 2014

... these are a few of my favourite things!

This is my first post of the day - please scroll up to see my second post

Happy New Year to you all! Did you have a great Christmas and New Year holiday? Of course, I ate and (probably!) drank too much ... and didn't craft anywhere near enough to satisfy me over the break! So it's good to be back :o)

After our fortnight long break, it's time for the first challenge of 2014 at Incy Wincy Designs - we've said farewell to Nikki F, Samatha and Sheryl (Bye girls!) and we're welcoming 4 new girls to the DT; LarissaLynneMichelle and Sarah. Welcome girls! (Please go and leave them some blog love.) We're also be welcoming some new sponsors along the way as well as some favourites!!! So let's kick off with the details of this week's challenge. We're easing you back into things gently, as we'd like to see projects featuring Three of your Favourite Embellishments.


We've got 2 sponsors lined up this week, which means two lucky crafters will receive prizes! Our first sponsor is Ken and his team from QKR Stampede who are offering our first lucky prize winner 5 Digital Images from their store. Their website says: "Ken has a unique, somewhat quirky, style with lots of humor and character" so you're bound to find the right image for your needs here.


Our second sponsor is Wendy and her team from Digital Delights, and they are offering our second lucky prize winner a $5 Gift Certificate to their on-line Store. Here's a little about them: "Welcome to your one stop shop for all your digital stamps, paper piecing and digital products which are instantly downloadable. We also have a wide range of digital papers and cut files for all your crafting projects. Our low prices reflect our belief that crafting should not only be fun but affordable too!!"


Both Sponsors have very kindly given the DT some images to showcase, and here is my card featuring a delightful image from QKR Stampede and using three of my favourite embellishments which are Heat Embossing, Twine and Faux Buttons:


My card recipe is as follows:


  • Base Card - is some black card I had in my stash which I cut, scored and folded to make a 15cm square card.
  • Background - is stamped using the Starburst Border from this A6 Basic Borders Stamp Set which I
    stamped three times across the card using a Versamark Stamp Pad and Holographic Embossing Powder and then I heat set it - I love this sparkly finish, don't you?
  • Image - is the uber cute Patchwork Moon by Ken at QKR Stampede. I wanted to do something a little different, so I paper pieced him using papers from the Hello Sunshine Digital Paper Pack by Zoe Pearn, available from Sweet Shoppe Designs. The moon himself is done from a cream coloured textured paper and then I used 4 different patterned papers from the pack, before using my Silver Gel Pen to add some highlights.
  • Faux Buttons - are made using the circle and star shapes which are part of the Patchwork Moon image and this fab tutorial by my former Crafty Pad teamie Leesa ... never again will you struggle to find buttons that match the colours of your project! I printed my "buttons" onto paper from the Hello Sunshine pack before cutting out, assembling (I didn't add any embossing powder to these) and threading them onto the twine.
  • Twine - from my stash which I fixed to the moon's hat, but have left loose at the bottom so that the buttons give some movement to my project.
  • Sentiment -  is by Paulette at Create with TLC.

Come on over to Incy Wincy Designs and give our 4 new girls a very warm welcome. Whilst you're there check out the wonderful creations by my very talented teamies and see what their Three of your Favourite Embellishments are. Don't forget to come back and show us your embellished creations, and make sure you tell us in your post what your favourite 3 are! - this challenge will end on Sunday 13th January 2014.


I would like to enter this card into the following challenge:

Hope you have a good day.
Hugs, Helen x

Saturday, 30 March 2013

Snowflake Painter

Hello friends,

Hope you are all well and enjoying your Easter weekend. Here's another non-DT card from me; I decided as the weather in the UK has been soooo unseasonal in the last couple of weeks, that I would make a snowy card.


I've had this image for a while and when I saw yet another snow flurry hurtle past the window last weekend, I knew what to make!

My card recipe is as follows:


I would like to enter this card into the following challenge:


I'm hoping to get another post done this weekend, as the end of March is the deadline for the current Progressive Challenges over at Crafter's Digital Art Center. If you get a spare hour or so to yourself to make a card or two, why not come over and join in the fun?


Hugs, Helen x

Monday, 11 March 2013

F is for ...

.... flowers, and quite a few of them!

Good morning my crafty friends and welcome to another challenge at Incy Wincy Designs.  This week we want to see   Something beginning with F..... (but that doesn't end in the word "off" please!)


Our sponsor this week is the lovely Megan from Dilly Beans Digi Stamps. Make sure you head over to her blog and check out her awesome digis! She also has "Collage Sheets" where she's made a themed coloured digi sheet, and there's a Dilly Beans Challenge Blog too! Megan is offering this week's lucky winner 3 digital images from the store. She also kindly allowed the DT girls their choice of image (thanks Megan!), and with so many totally gorgeous digis there, it was really hard to choose just one.


Then I stumbled across this simple digi (which screamed "Choose Me!" at me) and here is my really clean & simple inspiration for you this week:


My card recipe is as follows:

  • Base Card - is plain white heavyweight card (from my stash and I'm afraid the wrapper has long since disappeared, so I can't tell where it came from - sorry!), which I have cut, scored and folded to make a DL sized card
  • Image - is #344 - Daisy Squares by Megan from Dilly Beans Digi Stamps and it really lends itself to a CAS style of card. I think this image will be so versatile, not just for Birthday cards but also for Thinking of You, Get Well and Sympathy cards. I have brought these flowers to life using my Versamark Pen and Craf-T chalks (which I applied and blended using a cotton bud, and re-blended using the Versamark Pen to get a soft pastel image) and one Spectrum Noir Pen in the following colours:

    • Top Left Flower - Ruddy Red, Orange, Yellow Orange
    • Top Right Flower - Orange, Yellow Orange, Yellow
    • Bottom Left Flower - Magenta, Pink, Flesh
    • Bottom Right Flower - Violet, Orchid, Magenta
    • Sky - Spectrum Noir Pen in TB1
    • Background - Dark Green
  • Sentiment - is a cover freebie cling stamp from Cardmaking and Papercraft Magazine. It came from a set of "Country Diary of an Edwardian Lady" stamps. I inked it up using a Papermania Capsule Collection Pigment Ink Pad in Red Hot, and once I had stamped it on the card I coated the sentiment in Holographic Embossing Powder before heating it. Check out that gorgeous sparkle in this photo below!


It's not very often that a card comes together exactly how I imagined it would, but this one did!


Do head over to the Incy Wincy Designs blog, and make sure that my teamies and this month's Guest Designer Jackie have things beginning with the letter FThen come back and show us your projects - you've got until Sunday 17th March 2013 to link your creations up.

I would like to enter this card into the following challenge:


Hope you have great week!
Hugs, Helen x

Sunday, 3 March 2013

Thinking of You


Good Evening All,

This is another non-DT post from me ... and I'm using up some stash too! It's the beginning of March, and I'm still managing (in some form or another) to keep up with my resolution ... :oD


Here's a card I've made, having been inspired by a Freebie sentiment:


  • Base Card - a pre-made A6 card blank in cream
  • Design Papers - are from a set by Erica Zane called Grow and you can get this mini pack from Sweet Shoppe Designs. I've used Papers 2, 3 and 4 from the pack for this card.
  • Image -a cover freebie cling stamp from Cardmaking and Papercraft Magazine. It came from a set called "The Floral Collection". I inked it up using Tuxedo Black Memento Ink Pad and brought the flowers and leaves to life using my Spectrum Noir Pens in the following colours:

    • Flowers - GB1, GB3, GB4, GB5
    • Leaves - BT2, BT4, BT5, BT9
    • Sprays Versamark Pen and Gold Embossing Powder
    • Outline - GG1
  • Sentiment - is called "Thinking of You"  and it was a freebie at Beccy's Place last week. I love the wording of the Irish Blessing behind the main part of the sentiment and it is very reminiscent of a version that I have sung on many occasions at Guide events ... yes, another favourite vesper!

I would like to enter this card into the following challenges:

  • AC157 - Sketch Challenge at Annabelle Stamps - I've rotated the sketch through 180°
  • Challenge 55 - Blue and Yellow at Little Miss Muffet
  • Inspiration Challenge Group - Photo Inspiration at Crafter's Digital Art Center
  • Challenge #50 - Un-Inked Stamp at Use It Tuesday - not only has my image stamp never been inked up before, it's also been sat in my craft drawer since spring 2012 when it was a magazine cover gift, so I'm using my stash too! The card blank I've used was in a pack that I bought nearly 2 years ago, when I first started making cards.

Hope you've had a good weekend.

Hugs, Helen x