Showing posts with label Theme-Anniversary. Show all posts

Saturday, 1 October 2016

Shake it up!

This is my second post of the day - please scroll down to see my earlier post

Good afternoon blogging buddies! Yup, this is a second post from me today and I am beyond excited as I've had to keep this news to myself for 2, whole weeks!!!!! 


I am super proud to announce that Wendy and her team liked my entry for their DT Call last month and asked me to join them. I can now call myself a "Dressy Girl" at All Dressed Up and I can't wait to show you my creations with Wendy's gorgeous, girly images !!!!!!!!!!!!!!!!!!!! 


So over at All Dressed Up we're introducing all the new "Dressy Girls" both on the blog and also on All Dressed Up Facebook page, and each new DT member has been asked to make a card to showcase. Here's mine:


Papa Mia and I celebrated our 23rd Wedding Anniversary last weekend and this gorgeous image of Wendy's seemed to be just perfect to put on my card to Papa Mia.


My card recipe is as follows:
  • Card base - is a premade card around 14.8cm square
  • Top Card - is Centura Pearl Snow White Silver cut to fit over the card base. I've die cut into the the middle of this piece of card with my largest Die'sire Essentials Hearts die.
  • Shaker Window -  I wanted the die cut heart to be the rear part of my shaker window, so I placed the top piece of card central on my base card, and stuck the heart down through the heart shaped hole! We had a corrugated cardboard box in our recycling, so I cut a smaller square from this, and die cut an aperture with my largest Die'sire Essentials Hearts die. I stuck this down to my base card over the Centura Pearl heart and then filled the hole with pale purple heart sequins and silver glitter which I discovered in the Bambinos' "arty cupboard". A square of acetate stuck over the top of the cardboard sealed the window.
  • Image - this gorgeous girlie is called Love You and she is by Wendy at All Dressed Up Stamps. I have brought this girl to life using my Spectrum Noir Pens in the listed colours before fussy cutting her and adding her to my card
    • Skin - FS2, FS3, FS4, TN4, FS8 (Blush)
    • Hair - TN3, EB3, EB8
    • Top - IG1, IG2, IG3
    • Jeans - TB2, TB3, TB4
    • Outline - BT1
  • Sentiment - is from the Swirly String Sentiments Set by Lili of the Valley which I stamped in Black Memento Ink directly onto the Centura Pearl

If you want to be blown away by some outstanding creations, please head over to the All Dressed Up Challenge Blog and check out the line up from the other new "Dressy Girls" - make sure you say "Hi" to them all as well won't you? 

And, if you're in need of a further Dressy Fix before our next blog challenge, don't forget that we also have a Facebook Group (with a new monthly challenge starting), a Pinterest Board and, of course, Wendy's  Esty Shop.

I would like to enter this card into the following challenge:


Hope you enjoy the rest of your weekend!

Hugs, Helen x


Tuesday, 12 April 2016

A Golden Time!

Hello all!


Hope you've had a good start to the week. Yesterday was "back to school" day for us at Casa Mia - not too many poorly peeps for the first day back, so I managed to get some admin bits and bobs tied up! 


Although I made this card last month, somehow I just didn't get around to blogging it and as a few challenges have popped up in my blogger feed I thought now would be a great time to air this beauty!


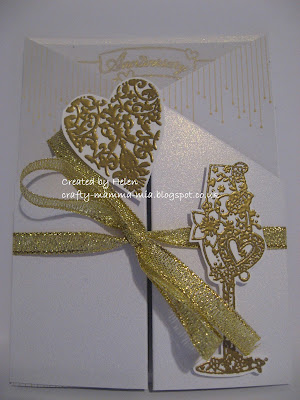
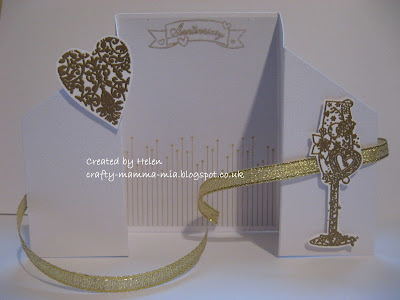
A good friend asked me to make a card celebrating her parents' Golden Wedding Anniversary, and gave me free rein to do what I wanted .... eeeeeek!!!!!!!! This was the result ... a double gatefold card:


My card recipe is as follows:

  • Images - are from freebie stamp set which came with a Cardmaking & Papercraft Magazine some time ago. I've stamped these onto Neenah Solar White cardstock using VersaMark Ink and then given them a liberal coating of gold embossing powder which I then heated. Once dry and cool, I fussy cut around the images and attached them to the front panels of my card with foam pads.


  • Sentiment - is another stamp from the Cardmaking & Papercraft Magazine set, which I've stamped directly onto the rear panel using gold ink
  • Ribbon - is from my stash and I've attached this to the outside of the rear panel of the card, and then threaded it behind the stem of the champagne flute so that it stays in place when the card is open.

Sorry this post is very "photo heavy", but I wanted to show you all the golden elements that went into this card ;o)!


I would like to enter this project into the following challenges:

That's it from me for today. I've got a few errands to run now, and then I might get to "play" a little later on. Whatever you're up to today, I hope you get some crafty time.

Hugs, 
Helen x

Tuesday, 28 May 2013

What's your "Magic" Number?

Hello to you all. Hope you had a great Bank Holiday weekend if you're in the UK. I've only got one gripe ... who pinched the sunshine? It's like December here and Hubby's weather station says we've had 1.8cm of rain today. And I guess we'll still have a drought in the summer! Still, the plants we bought yesterday will be happy being "bedded" in to their new homes :o)

I would like to welcome a couple of new followers - a warm welcome to Durga and Desire, and huge apologies Desire for not having welcomed you a couple of weeks ago! I hope you'll both enjoy your visits to my creations.


Photobucket
Today is Post 3 of my sojourn as a Guest Designer at Top Tip Tuesday and this weeks it's new challenge time! This fortnight's challenge is Numbers, so we're looking for numbers on your projects ... perfect for Birthdays and/or Anniversaries, and we'd love to see how creative you can be!


We've got 2 amazing sponsors lined up for you for this challenge. Jodie from Bugaboo Stamps is offering one lucky random winner 7 digis of their choice! And Tammy from Shape EZ is offering our second winner 2 digital shape templates of their choice! Those are magic numbers worth winning me thinks! :o) And, as if that wasn't enough, you too could be a future Top Tip Tuesday Guest Designer just by leaving a great tip! Both of our fabby sponsors have given us the choice of which of their products we would like to showcase and next week I'll be showing you one of Tammy's great card templates. However, this week I've designed with one of Jodie's fantastically quirky images:


My card recipe is as follows:

  • Base Card - made from Centura Pearl in Ivory which I cut and scored to make a 15cm square card
  • Design Papers - are all from the set Only You by Studio Basic and available at Sweete Shoppe Designs. I've used 3 of the papers in this kit, layered them digitally and put a dove grey faux mat layer around each paper using my word processing programme.
  • Image - this great couple are called AKV Love from the great range A Kid's View (Stick People) by Jodie at Bugaboo Stamps. Because this image is soooooo quirky (and the fact that I digitally layered this onto my DPs and my pens won't colour nicely on the card I printed this on!) I continued with the "kids" theme and actually coloured this image using some of my girls' wax crayons!!!!! I tried to keep the palette very simple and these are the colours I used:
    • Him - Yellow, Red, Brown
    • Her - Red, Brown, Black
    • Heart - Red
    • Sky - Blue, Red, Orange, Yellow
    • Grass - Green
  • Sentiments - the bottom sentiment comes from the Only You kit, and is perfect for an anniversary card. The top sentiment is computer generated and, again, digitally put onto my layout by using a text box in my word processing programme and colouring the background to tone in with the DPs. Now, regular readers will know that I craft frugally and don't have a die cutting machine, so here is my TOP TIP for you: Don't worry if you don't have alpha or numeric dies ... in your word processing programme, play around with different fonts and sizes to get something you like - I've used Showcard Gothic in pitch 36. When you're happy, copy and paste it several times and print. Cut the shapes out, and glue them on top of each other to get a 3D effect on your card.


So, I think that makes my Magic Number 20! Just need to find a safe hidey hole for this card (away from my hubby) and, even more importantly, remember in September where it's hidden!!!!! The Top Tip Tuesday girls have got some great projects and tips for you so do go over and see their Numbers. Don't forget to come back and show us your creations! This challenge ends on Monday 10th June.


I would like to enter this card into the following challenges:
  • Challenge 55 - Celebrate at LEJ Designs
  • Challenge 11 - For the Fellas at Creative Craft Challenges
  • GGSC153 - Graduation, Wedding or Anniversary at Going Grey with Scrap Creations
  • SOS#103 - Graduation or Anniversary at Shopping our Stash - the wax crayons I used weren't exactly my stash as they came from my girls' (now 11 &13 years old) arts and crafts cupboard. The crayons hadn't been used for I don't know how long (the girls don't do colouring any more, it's all handheld devices that play games!) and are well over 2 years old ... I think they came in a goodie bag to keep the kids amused from a holiday company eons ago!!!!!!!!!!!!!!!!!!!!!!


Hope you have a great evening!

Hugs, Helen x


Monday, 6 August 2012

Love 'n' Sparkles!

Good morning friends!

I hope Mr Blogger is playing nicely today too, as I'm still sunning myself somewhere in the Eastern Med!

Today is the start of a new challenge at  Lexi's Creations and this fortnight we'd like to see your Sparkle and Shine! Our sponsors this time are the lovely team at Joanna Sheen who are offering our lucky winner a £10.00 Gift Voucher to their store!

The equally lovely Lexi at Fairy Dust Crafts has given everyone on the DT their choice of image and here is the card I'd like to share with you today:


This challenge coincides with Susan's First Anniversary of running the Lexi's Creations blog (congratulations Susan!) and, as my Wedding Anniversary is coming up in September, I thought I'd make a Anniversary Card.


My card recipe is as follows:

  • Base Card - made from Centura Pearl (just check out the gorgeous sheen on the above photo!) in Snow White which I cut, scored and folded into a 10cm square Triangle TriFold card. I saw this card fold on a lady's blog when I was doing one of my DT comments a few weeks ago ... I'm sorry if that's you as I can't remember, but thank you for the inspiration.
  • Design Papers - are called Red Polka Dots and Lots of Hearts on White, and they are both from the kit "Dance With Me" by Summer at Summertime Designs.
  • Image - This very simple but effective image is called Heart on Wire and it is by Lexi at Fairy Dust Crafts. I altered the image slightly by cropping it so that the dangling heart at the bottom of the large heart wasn't showing. I have coloured this very simply using Red Chalk (both wet and dry to get the colour intensity) and my Spectrum Noir Pens in CR11 (for the small 'strung' hearts) an BG2 (for the outline). I hand-stitched around the wire in backstitch using some silver thread I found in my lace-making stash! I then gave the whole piece a (liberal :o)!) coating of Iridescent Spray and Sparkle
  • Charm - Using my word processing package, I cropped and resized the main the image so that I was left with the dangling heart in a larger size. I then traced this onto Shrinkles plastic, coloured it in using my CR11 Spectrum Noir Pen, cut it out & made a hole suitable for getting thread through and then "cooked" it according to the instructions! Once it had cooled, I was able to mount it onto my card so it dangles.
  • Sentiment - by Paulette at Create with TLC which I've digitally superimposed onto my DP.


Head on over to Lexi's Creations and see what my "Teamies" have done to Sparkle and Shine and then come back and share your creation with us! You've got until Saturday 18th August 2012 to link your cards up.
Have a great week,
Hugs, Helen xxx


Sunday, 22 July 2012

It's gotta be love!

Hello friends!

Team A at The Crafty Pad are choosing the challenge again this week, and the lovely Joanie has set our task. She has chosen the theme of Interactive - make it move. So, your cards have to move, pop-up, spin, waterfall ... anyway you want it, as long as it moves!

We have a great prize lined up for our lucky winner this week, courtesy of our friends at Crafty Ribbons - this lovely bundle of Teddy Bear Picnic Ribbons ... do you think anyone would notice if I slipped in a entry to this comp as I think these ribbons are gorgeous?


Debbie, our lovely boss lady, has let the DT loose in The Crafty Pad Store again, and I chose the cute image called Teds in Love and here is my card:


Of course, we've gone interactive so this is a "shaker" card ... and here it is shaken, definitely not stirred!


My card recipe is as follows:
  • Base Card - made from Centura Pearl in Snow White onto which I embossed the smallest rosette shape from the "nest" on the Ultimate Pro Embossing Board Springtime Sweets and Cupcake Treats onto the top layer of my card and then cut this out to leave an aperture.
  • Design Papers - are called Colourful Polka Dots and Lots of Hearts Gray from a kit by Summer at Summertime Designs called Dance with Me. I used the same rosette shape from the "nest" on the Ultimate Pro Embossing Board Springtime Sweets and Cupcake Treats to get the aperture on the DPs, and cut these out.
  • Image - Teds in Love is just one of the many wonderful images by Debbie at Crafty Pad Designs and you can get your own copy of this lovestruck duo by clicking here! This couple came to life courtesy of my trusty Spectrum Noir Pens in the following colours:
    • Girl Bear - IG1, IG2, IG4
    • Boy Bear - IG4, IG5, IG6
    • Heart and Rose - CR10, CR11
  • Shaker Aperture Pocket - made from acetate, some thicker card (to separate my 2 layers of acetate) and fine red glitter (which I think came from a magazine earlier in the year)
  • Sentiment - computer generated using a banner and font in my word processing package

Why don't you hop over to The Crafty Pad and see the lovely projects that my "Teamies" and our awesome Guest Designer have made. Then come back and show us your Interactive creations! You've got until 8pm (BST) on Saturday 28th July 2012 to link your cards up.

I would like to enter this card into the following challenges:
Have a great weekend, and enjoy the (whispering) sunshine!

Hugs, Helen x

Saturday, 1 October 2011

Cute Anniversary Card

Hi,

Last weekend saw us celebrating our Wedding Anniversary. I knew he was expecting a hand-made card, so I couldn't disappoint him could I? This is what I made:


The digital stamp is called Roger Bear, and he came from Card Making Downloads . Everything else came from Crafters Companion - it really is a 'one stop shop'! Roger was coloured in with my Spectrum Noir Pens in shades of Cool Grey and the heart on his paw is shade 11, just to add a highlight. My base card is the green from the Centura Pearl Brights pack which I cut and folded in a 6" square card. The papers were a freebie (from the member's section) and are aptly entitled Valentine Project! I used my normal word processing package to produce the sentiment - the font is Tempus Sans and I really like this on the front of cards.

I wanted to make the inside of the card a bit special too, so I made it into a pop-out card. I used the embossing board Springtime Sweets and Cupcake Treats to go with my Ultimate Pro from (where else but) Crafters Companion . The pop-out heart is the middle sized one on the board. I also embossed and cut out the smallest one in the same green card as my base and then suspended this in the larger heart using a gold thread.


The sentiment is from the wonderfully generous Paulette at Create With TLC and says brilliantly what I'm not very good at telling my other half! The sentiment is matted onto the same backing paper as my image in order to tie the inside and outside of my card together.


I would like to enter this card into the following challenges:

Happy World Cardmaking Day everyone!

5/10/2011 - UPDATE!!!!

I've just found out that this card was Runner Up at Kelley Kids Challenges. Whoop whoop whoop and smiles all round! :o)