Showing posts with label Button. Show all posts

Wednesday, 6 May 2015

Is it a bird? Is it a plane? Nope, it's ........

.... my weekly post for Incy Wincy Designs! It's new challenge time and this week we're helping our crafty friends in the US and Canada spoil their Mum as our challenge this week is Mom's the Word. 


We're being sponsored this week by the very lovely Heather Valentin from Lacy Sunshine who is offering a prize of 3 of her gorgeous digis to our lucky prizewinner! Heather also very kindly gave each DT member their choice of image to use for this challenge. Back to the post title then ... Is it a bird? Is it a plane? Nope, it's Glitter Girl Superhero - perfect for all those superhero Mums out there!!!!!!!


Now I'm in a bit of a pickle - firstly, my Mum is no longer with us and secondly we've already celebrated Mothering Sunday here in the UK .... so I've just gone for a very "girly" card in the hopes that it inspires you to make a creation for your Mum/Mom!


My card recipe is as follows:

  • Card Base - is a pre-made white card base, around 14.7cm square
  • Papers - the Paisley Print paper is from a set by Summer at Summertime Designs called Angel Mother. The lovely Medium Pink glitter paper comes from a set at Pixel Scrapper Digital Scrapbooking called Glitters by Dreamn4ever Designs - I think this set must be retired now, as I can't find it on the site. I've digitally added a brown border to both papers to give a faux mat and layer.
  • Image - this very sparkly one is called G3 Glitter Girl Superhero and she comes from the pen of Heather at Lacy Sunshine Stamps. I've brought her to life using my Spectrum Noir Pens in the listed colours before die cutting her using one of my Sizzix Framelits Ovals
    • Skin - FS2, FS3, FS6, EB5, DR7
    • Eyes - GB10 DG2, Blender Pen
    • Hair - GB8, GB10, EB5, EB8
    • Clothes - PP4, PP5, PP6, DG2, DG3, DG4, DR1, DR3, Silver Gel Pen, GB3, GB4
    • Bag and Boots - PP1, PP3, Silver Gel Pen
    • Glitter Cascade - Silver Gel Pen, White Glitter
  • Sentiment - is by my favourite sentiment designer, Paulette at Create with TLC and was diecut using a die from my Die'sire Essential Rectangles set. Some "bling" in opposing corners finished this off.
  • Ribbon and button - are from my stash and both came from separate "bargain grab bags" from Hobbycraft some time ago. I've attached the button to the bow by way of some silver thread from my (languishing) lacemaking stash!

I'm not 100% happy with this card (hence why I'm a bit late joining in with this week's challenge), but it's done now! I hope you'll come over to Incy Wincy Designs and check out the fabulous creations by my lovely teamies, and while you're there please give Judy (our newest teamie) a warm welcome. Then come back and show us your creations for Mom/Mum. This challenge closes on Sunday 10th May.


I would like to enter this card into the following challenges:

If, like us, you're suffering with strong winds and heavy rain showers I hope you stay safe! And if you're celebrating Mother's Day this weekend, I hope you get spoilt by your loved ones!

Have a great week!

Hugs, Helen x

Sunday, 1 March 2015

Green Welly Brigade

Good morning friends!


Hope this post finds you well. Mother in Law is getting more confident on her crutches each day and therefore more mobile and more independent ;o) , so the volume of checking up on her is reducing slightly. As well as getting to my studio class and pounding the treadmill this week, I've found time to do a bit of crafting.


In my B.C. crafting days (B.C. = Before Cardmaking!) I was an avid lacemaker, and could regularly be found with my late mother at local fetes and country shows with our pillows and "makes". Some of the time we sported wellies (country shows can be messy affairs!) and yes, mine were green!!! A mutual friend of ours also demonstrated and sported green wellies, and we quickly became known amongst lacemaking friends as the "Lace Trimmed Green Welly Society"! Another friend (who also made lace bobbins) made us all membership bobbins, with a pair of green wellies trimmed with lace on them and my membership number was 4. Sadly, I don't think the "LTGWS" is still going, but I reminded of those happy days when I was going through some of my digis, and this card was born.


My card recipe is as follows:
  • Card base - is a pre-made 14.7 cm square card in white cardstock
  • Design Papers - are from my favourite CD-Rom at the moment ... Sugar and Spice Papercraft
    CD-Rom Collection. I have matted and layered these onto Kraft Cardstock
  • Image - is called Pattern Wellies and it comes from the pen of Claire at Jellypark. This is a new store for Claire (she had to close her old store down at the end of December thanks to the new EU VAT rules on digital sales) so she is in the process of transferring her many images across - the wellies aren't there yet! I coloured these wellies using my Spectrum Noir Pens in the shades listed, before die cutting them using a Sizzix Framelits Oval Die.
    • Outside of wellies - DG2, DG3, DG4, PL1, PL2
    • Inside of wellies - EB1, EB2
    • Ground - EB1, EB2, EB5
    • Outline - CG1
  • Sentiment - is a magazine freebie, from Quick Cards Made Easy, and I stamped this directly onto my DP using Memento Ink in Tuxedo Black.
  • Some buttons from my stash, and a die cut flower using Die'sire Classiques Delicate Flower edged with a Papermania Hot Pink ink completed this card.

I would like to enter this card into the following challenges:

Hope you have a good Sunday!

Hugs, Helen x


Friday, 25 April 2014

Pretty in Pink

... or perhaps this post should read "Pretty Pink"!

I'm sooooooo sorry - I'd scheduled this post, but naughty Blogger hasn't posted it! "Hanging head in shame here cos it means this post is late :o( Hope this post finds you well. Yesterday was my first day back at work after the Easter break and boy, what a day it was. I came down from my holiday cloud with a bump yesterday morning!


This is my last post as a Guest Designer for Delicious Doodles :o( - very sad face being worn here! The month of April has flown by, and I would like to thank Teri and her Design Teams for having me this month - I have had a blast!!!!!! I hope that the Guest Designers for May have as much fun creating with Teri's images as I have had!


If you read last week's post at Delicious Doodles, you'll know that we're raising Breast Cancer Awareness and this week we'd love to see your creations that are Pink and Girly!


Teri again opened the doors to the Delicious Doodles Shop and allowed me to choose some digis to show you this week, so here goes with my second "pink" card (although I'm not sure it's 100% girly!):


This will be another card for the box of cards I'm making as a raffle prize for the Shades Charity Ball that my friend Karen is organising in October - the proceeds from this will go to MacMillan Cancer Support.


My card recipe is as follows:
  • Card base - is Centura Pearl in Snow White Silver which I have cut, scored and folded to make a 16cm square card. 
  • Design Papers - are both part of the April "Blog Train" at Pixel Scrapper Digital Scrapbooking. The pink leaves paper is by Whispy Willow Lane, and the white paper with the floral and flourish border is by Designs by Magnolia. As usual, I resized the papers to my requirements using my word processing package, and digitally put a faux mat and layer around them in a rich pink colour.
  • Image - is by Teri at Delicious Doodles and it is the utterly gorgeous Celtic Fairy and I have brought her to life using my Spectrum Noir Pens in the following colours (click on the pic to supersize it, and check out the sparkly pink hair and wings!):
    • Hair - BP2, BP3, BP4, BP5, White Glitter
    • Skin - FS2, FS3, PP3, BP2
    • Jewellery - Silver Gel Pen
    • Dress - BP1, Colourless Blender
    • Wings - BP1, Silver Gel Pen, White Glitter
    • Outline - BT1
  • Sentiment - is by Teri at Delicious Doodles and it is the heart from the Awareness Ribbon Set. The ribbon set is a freebie (thanks to Teri's generosity), so why not treat yourself to another digi as well .... 2 for the price of 1! I imported the heart into my word processing package three times, and lined up a text box over each heart to write the sentiment. I then coloured these using my Spectrum Noir Pens in colours BP1, BP5, BP7 and Colourless Blender, trying to get an ombre effect!
  • Ribbon - is recycled from, I think, a toiletries package. It's been lurking around for a while, and I think this is the perfect project for it!
  • Buttons - are from  a "grab bag" of mixed bright buttons I picked up at Hobbycraft a few months ago.


I hope you'll come over to the Delicious Doodles Challenge Blog and enjoy the wonderful Pink and Girly creations from Teri's talented Design Team and my fellow guests. Don't forget to then come back and show us your creations - you don't need to use a Delicious Doodles image to enter the challenge but if you do, you get a second entry in the draw to win 5 of Teri's images AND your work may be Spotlighted on the challenge blog! This challenge will end on Thursday 1st May 2014 at 6pm BST (UK time!) 


I would like to enter this card into the following challenge:
  • Bingo at Catch the Bug - I've chosen the far middle vertical line of Hot Pink, Players Choice (Glitter and Button) and Recycled Item (Pink Ribbon was part of the wrapping on some toiletries)
  • Challenge #208 - Square Cards at Robyn's Fetish
  • White + 1 at Papertake Weekly
  • Monday Challenge #134 - Shake it On! at My Craft Spot
  • Sparkle! at Crafty Boots Challenge
  • Favourite Item to Recycle and Why at As You Like It - Oh ladies! I am sooooo with Annette .... ribbons are my favourite item to recycle. You get them in all types (satin, grosgrain, sheer, printed) on various purchases and gifts. The one in this project came from a gift pack of toiletries, but I also save them from clothes, presents (as part of the gift wrap) and even from an enamel jug of flowers (the flowers have died, the jug now holds some fake blooms, and the ribbon's in my stash!!!!)

That's it from me today - hope you all have a great weekend!

Hugs, Helen x

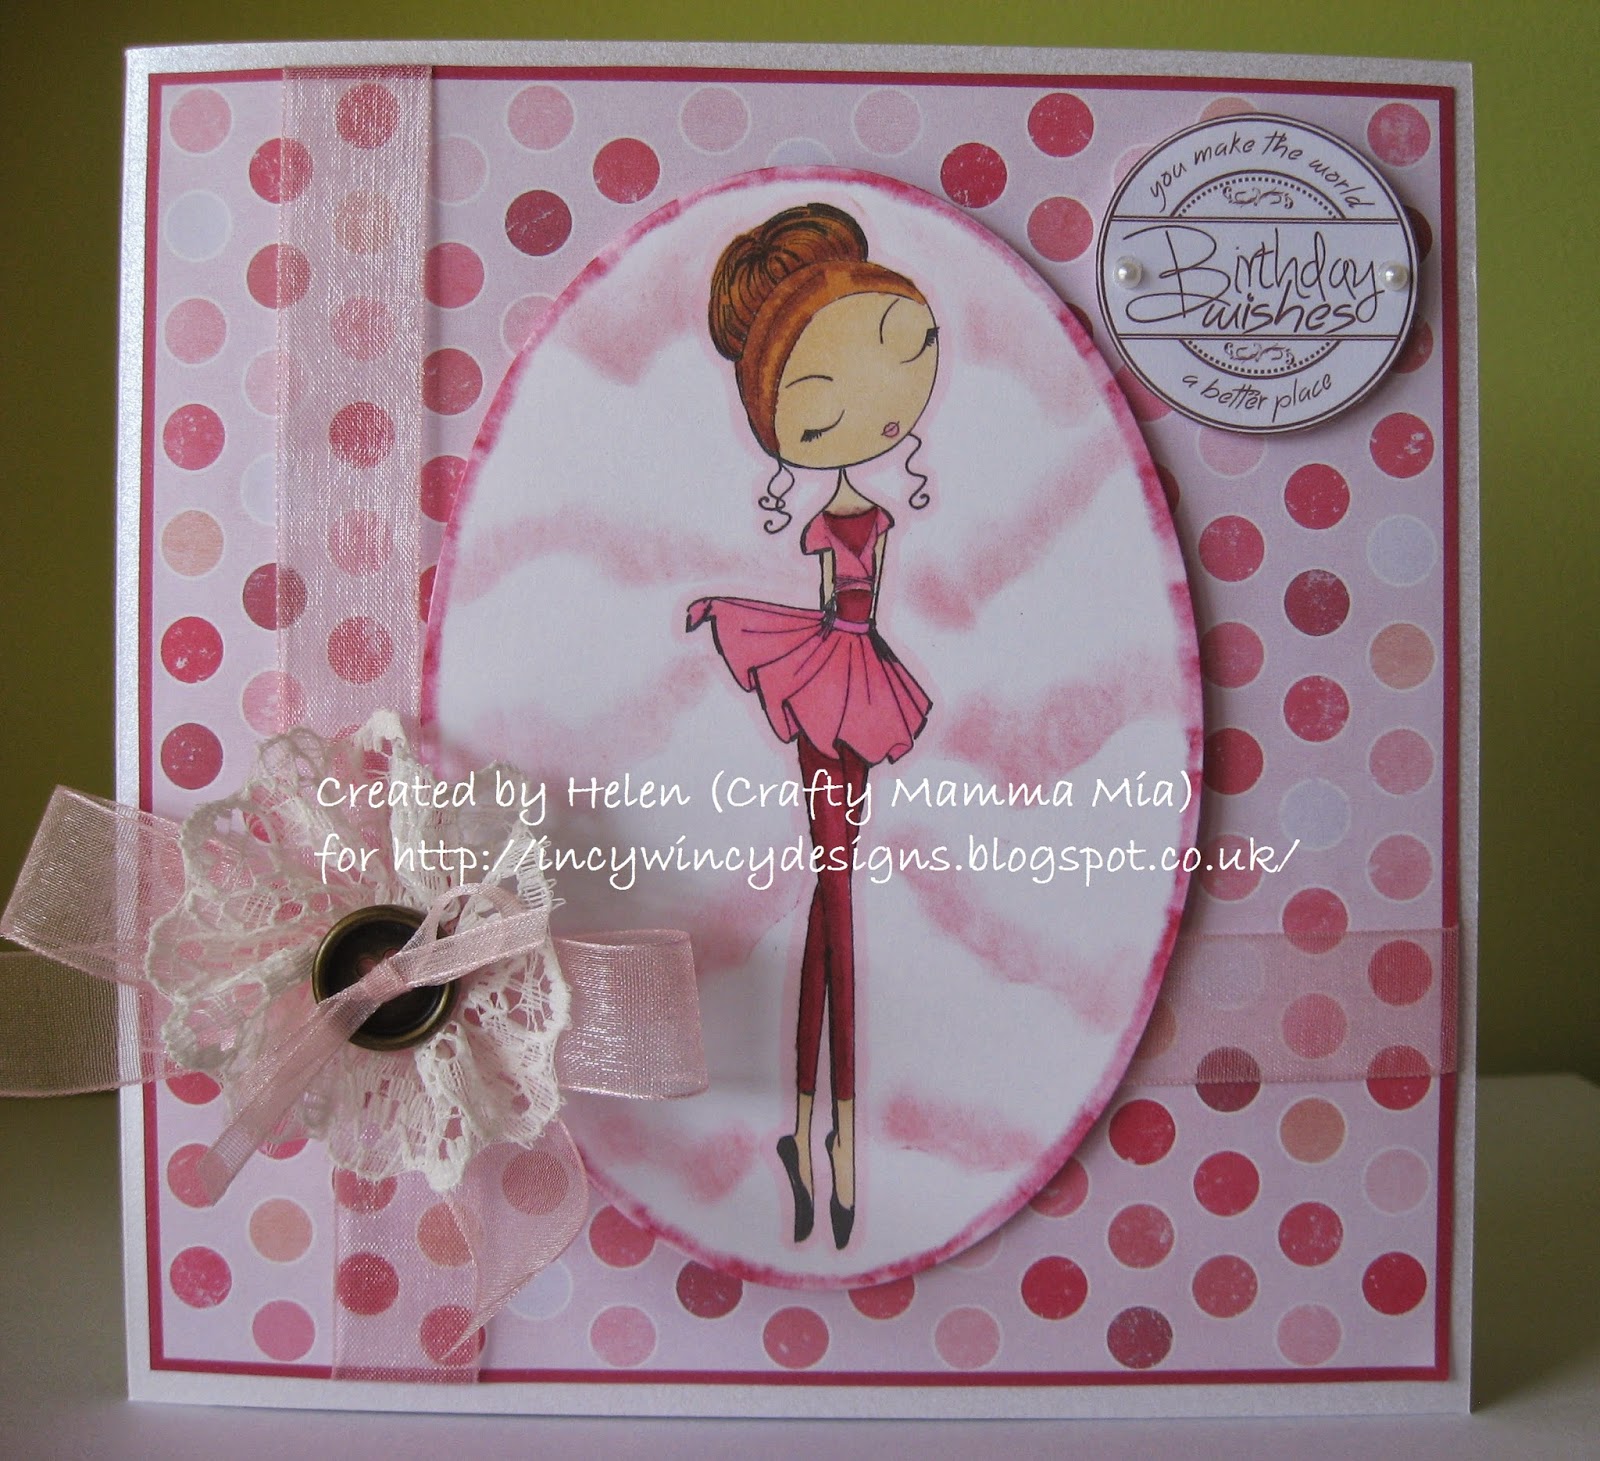
Tuesday, 25 March 2014

Prima Ballerina

Good Morning my lovely friends and we're already in a new week! I had planned to write and schede this post before the weekend as I was doing some celebrating, but I got waylaid ... another 40-harummph birthday, but who's counting!!!!!! 


Anyway, we've got another new challenge at Incy Wincy Designs and this week we're going all girly as your creations need to feature Ribbons, Lace and Pearls. 


We have 2 amazing sponsors this week which means we are able to offer a great prize to 2 lucky winners!


Our first sponsor is the lovely team at The Paper Shelter who are kindly offering our first lucky winner a $20 Gift Certificate to their store. Don't forget that with every image you buy from The Paper Shelter you don't
just get the black and white line drawing; you get a coloured image, Design Paper, and a complete composition for when you really need that card in a hurry - OK, we all know we sometimes have those times!!!!! Normally for me at 8am when my girls remember it's so-and-so's birthday today - can you make a card Mum? :o)


Our second sponsor is a new one for Incy Wincy and it's Wendy from All Dressed Up. Wendy is offering our second lucky winner 2 digital images from her store. Here's a little bit about Wendy:
Hi I am Wendy Burns I live in Nottingham UK with my husband and two children who have been the inspiration behind the characters,  in particular my daughter who has kept me up-to-date with blogging and trends.  I work predominantly within the textile children’s wear market, fashion and interiors.
I trained as a textile designer and although my work is digital based, I love to retain that hand drawn /sewn feel which I hope comes across in my artwork.
Digital stamps is a new challenge for me and the opportunity to work with the All Dressed Up Team and has been very exciting, in particular the creative way my characters have been given individual personalities by the designers .
All Dressed Up is a newly launched blog with an enthusiastic team who are passionate about stamping.  The coordinators Marilyn and Tracy along with an amazing design team are also known as The Dressy Girls.
We have a friendly Facebook page, regular blog posts, tutorials, challenges and freebies .The stamps can be purchased from the Etsy shop which is updated on a monthly basis.
We really are friendly bunch and would love to see your creations so please feel free to contact us and visit the All Dressed Up Challenge Blog.


The DT have been really lucky as both our sponsors have very kindly supplied us with images to use for our inspiration projects for this challenge. I have used an All Dressed Up image for my card which I made for one of my dear friends who celebrates her birthday next week - I think I'm safe in posting this now 'cos I don't think she peeks at my blog!


My card recipe is as follows:
  • Card Base - is Centura Pearl in Snow White Silver which I have cut, scored and folded to make a 15cm square card.
  • Design Paper - is by Marisa Lerin at Pixel Scrapper Digital Scrapbooking and it is called Polka Dots 21 Paper Pink (from her Vietnam Papers Kit #3. The colours in it resemble the small girls I see running around in their leotards and tutus, getting ready for a ballet class in the community facilities at work! As usual, I digitally sized this paper in my word processing programme before putting a raspberry coloured border round it to give a faux mat layer.
  • Image - this dancing diva is called Love to Dance and she comes from the pen of Wendy all All Dressed Up. This girl also comes with a lovely polka dot heart and her own sentiment, neither of which I've used on this card. I brought her to life with my Spectrum Noir Pens in the following colours
    before die cutting it with my largest Framelits Oval Die:
    • Hair - TN6, TN7, TN8
    • Skin - FS2, FS3, CR4
    • Leotard & Leggings - DR6, DR7
    • Wrap & Tutu - PP5, PP6
    • Trousers - DR5, DR6, DR7
    • Ballet Shoes - Already printed in Black
    • Outline - PP1
    • Background - Craf-T Chalk in Pink
    • Edge Distressing - DR6, Colourless Blender
  • Sentiment - is a freebie by my lovely blogging friend Annette, and I have to confess this is one of my faves (I know I only used it a couple of weeks ago!). I recoloured this to a similar raspberry shade as my faux mat using my word processing programme before adding a couple of pearls from my stash to it.
  • Ribbon - is pale pink sheer organza in 2 widths which I think came from a local haberdashery store. The wider ribbon is layered both ways in an offset cross shape and I have also used it to make a bow under the lace flower. The narrow ribbon runs under the cross of wider ribbon and through both the lace flower and button before being tied in a bow.
  • Lace - is from the same haberdashery store and I have sewn running stitch along a length of it and then gathered it into a flower shape. I was busy making this whilst waiting for youngest to get changed after her swimming class at the weekend when a lady came up to me and said that she'd been watching me make it and how intricate and delicate it was! Yet they really are soooooo simple to make :o)
  • Metal Button - was rescued (sorry, I mean recycled!) from a lovely pair of trousers that my eldest grew out of and it's been sitting in my crafty stash, just waiting to be used!

So that's my card featuring Ribbons, Lace and Pearls - I hope you'll come over to Incy Wincy Designs and take a peek at the other gorgeous creations by my very talented team-mates, before you share your creations with us! This challenge will end on Sunday 30th March 2014.


I would like to enter this card into the following challenges:

Hope you have a good week!

Hugs, Helen x

Wednesday, 13 November 2013

Wake Up and Smell the Coffee!

Good afternoon everyone and "Happy Hump Day"! We're over Wednesday lunchtime, which means it's downhill to the weekend ...... wheeeeeeeeeeee!!!!!

I know I don't usually do mid-week posts (unless I'm GDTing) but I'd been toying with this card in my mind. And then yesterday, a whole host of challenges popped up in my blog reader and crystallised my thoughts. So this morning I went for a run (OK, if you'd seen me it was more of a waddle ... and then I bumped into 2 students from school, waiting to be picked up to go to their college course; I was looking puce and sweating buckets! Heaven only knows how many sniggers and giggles I'll face tomorrow!) and then went to my yoga class. Came back at lunchtime, knuckled down ... and here's the result of this afternoon's labours:


My card recipe is as follows:

  • Base Card - pre-made Kraft Card Blank in A6 size
  • Design Papers - are from a kit called Comforts of Home by Summer at Summertime Designs.  (I think that's quite appropriate given the image and sentiment don't you!) The bottom layer is called Large Dots Paper and the top layer is called Red Chevron Paper. 
  • Image - this lovely image was a digi freebie on The Alley Way Stamps Blog in November 2012
    (unfortunately it is no longer available) and I believe it was drawn by Alison Spelman - can't you just smell the coffee? I looks like it probably is now part of a stamp set called Breakfast Club. I die cut around the digi using an oval die before paper piecing it - my TOP TIP here is to make sure your scissors don't have any sticky residue on them which could wreck your fiddly cutting, give them a clean ... I find that a bit of cotton wool soaked in nail polish remover does the trick (and it doesn't involve rummaging in "himself's" shed for the white spirit either!!!!!) The bottom layer and handle are from Small Dots Paper (Comforts of Home kit), the band reminded me of a wrapper you get with a take-away coffee so I paper pieced this from a sheet of Kraft Card and then the heart shape was printed on Red Dots Paper (Comforts of Home kit) - once the heart was stuck on the other layers, I gave it a slick of Glossy Accents to highlight it. I finished the oval off by hand drawing some faux stitching in my metallic Bronze Gel Pen.
  • Sentiment -  is by one of my favourite "sentimentalists" and that is Paulette from Create with TLC. This was a recent freebie on her blog ... thank you Paulette. I have put the sentiment into a speech bubble from the Speech Bubbles set, a freebie from Squigglefly. Again, this came under the spell of my trust metallic Bronze pen, and came out the other side with some faux stitching on!
  • Ribbon Slider - is made from a length of satin ribbon in sage green and a faux button. This was made from 4 circles punched from Kraft card using my 1.5 cm circle punch which were stuck together, had 2 holes punched through and then slicked with glossy accents which was allowed to dry before threading my ribbon through.
So there you have it - and I'm quite pleased with this afternoon's work! Now I've just got to put the shopping away and cook tea, oh and hide the evidence of this afternoon's crafting session and pretend I've been doing housework :o) !!!!!!!!!


I would like to enter this card into the following challenges:
Whatever you're doing this afternoon/evening, have fun!

Hugs, Helen x

Wednesday, 20 March 2013

Mother's Day Card


This is my second post of the day - please scroll down to see my first post


Hello again, crafty friends and welcome to "Who's the dimwit, Version Two"! Yes, that would be ummm, errrrrr (looking round room frantically) .... Me again!!!!! :o)

It's new challenge time at Lexi's Creations and this time Susan has set us the challenge of Mother's Day or a Special Female Birthday Card.  Obviously, Mothering Sunday (Mother's Day) in the UK has now passed, but you can show us the cards you made for your mother this year, as long as there's no backlinking, or you could make a card for a special female in your life.


Our sponsor for this fortnight's challenge is the lovely Lexi from Fairy Dust Crafts, who (as well as letting the DT loose in her store to choose images to showcase for this challenge) is offering our lucky winner 5 Digital Stamps from her store. Not only will you find the gorgeous digital images there, you'll also find rubber stamps and lots of other fabulous crafting goodies like Viva Decor, Promarkers, a variety of lace and ribbons, embellishments, flowers, charms etc. and all at fantastic prices ... now that's well worth a visit!


So, here is the card I made for my Mother in Law featuring one of Lexi's gorgeous images: 


My card recipe is as follows:

  • Base Card - is Centura Pearl in Ivory, which I have cut, scored and folded to make a 15cm square card
  • Design Papers - from the Paintbox Poppets Papercrafting Collection CD Rom this is a Card Companion Set meaning there are matching papers, sentiments and embellishments just ready to be printed! I love the soft colours of this set.
  • Image - this gorgeous bouquet of flowers is called Roses and is by Lexi at Fairy Dust Crafts. I have brought them to life using my Spectrum Noir Pens in the following colours:
    • Roses - PP4, PP5
    • Seedheads - Gold Gel Pen
    • Foliage - DG2, DG3
    • Wrap - FS2, FS3
    • Ribbon - PP4, PP5
    • Outline - GG1
  • Sentiment - is by one I created within the Paintbox Poppets Papercrafting Collection CD Rom Card Companion using the inbuilt Verse Writer. This natty part of the program means that you can tailor make a sentiment for the recipient, before printing out the set. And as my MiL is a "church lady" and believes that Mother's Day should be Mothering Sunday (to give it the correct title from the church calendar), I was able to oblige!
  • Buttons - are faux button embellishments from the same Card Companion set. I cut the "buttons" out, and then stuck 2 more layers of card underneath each one to make them stand out from the card a bit more.

Head on over to Lexi's Creations and see how my talented teamies and our Guest Designer Viv are celebrating Mother's Day or Special Female Birthday. Don't forget to come back and share your creations with us! You've got until Saturday 30th March 2013 to link your cards up.


I would like to enter this card into the following challenge:


Hope you all have a fab week!

Hugs, Helen x

Friday, 15 March 2013

Pretty in Pink

Evening All,

Just a swift post from me as I'm very behind with my card making and blogging due to computer "gremlins" delaying me!!!!! Anyway I'm here now with this week's card for Whoopsi Daisy, and our theme for you this week is Button or Bow - use one of these on your card.


Our lucky winner's prize is (as usual) one sheet of images from the Whoopsi Daisy Store, unless you've used a Whoopsi Daisy Image for your project in which case you can choose two sheets of images.


Here is my card for you using one of Linnie's pretty digis available from her store:


My card recipe is as follows:

  • Base Card - made from Centura Pearl in Snow White which I cut, scored and folded to make a 12cm square card.
  • Design Papers, Tag, Button & Bulldog Clip Embellishments -  are a Card Companion set from the Strawberry Kisses CD-Rom. I'd forgotten how good these sets are until I was reminded by my lovely blogging friend Julie who has been using matching card companion sets from other CD Roms. Thanks for the reminder Julie!
  • Image - This lovely girl is from  Sheet 430 and she is just one of the gorgeous digis drawn by Linne at Whoopsi Daisy. I brought this sweetie to life using my Spectrum Noir Pens.
  • Sentiment - is a cover freebie cling stamp from Cardmaking and Papercraft Magazine. It came from a set of "Country Diary of an Edwardian Lady" stamps. I inked this using Memento Ink in Tuxedo Black.
  • Twine - from my stash


I hope you'll come over to Whoopsi Daisy, check out the gorgeous samples by my DT colleagues and join in this week's fun!


I would like to enter this card into the following challenge:
  • Challenge #145 - 3 Embellisments that start with the letter 'B' at Sentimental Sundays - I've used a Button, Bow and a Bulldog clip!


Hugs, Helen x

Monday, 3 September 2012

September Days .....

This is my second post of the day - please scroll down to see my earlier post.
Hi,
It's time for a new challenge at Lexi's Creations and our challenge this fortnight is Autumn Colours. I love watching the trees around our house change colour from green, through yellow and gold to flame red ... although the leaves when they're wet make rather a churned up mess on the paths we have to walk down to get to school!

We're welcoming Priyanka from My Heart Pieces as our sponsor again this week. Here is a little bit about her:
Hi I am Priyanka from India, I am a student here.I want to welcome you in my wonder land My Heart Pieces. This art world is for me a wonder land, because what I can imagine I can give shape only here. Like fairy, vampire is not happen in real life. I greatly appreciate it that you give your valuable time to see my digis. I always try to keep an extra touch on my every images so they can make a place in your heart and can directly touch their heart who receive your hand made gifts. So come and enjoy. My store have an Challenge Blog and freebies every Monday.


Head over to Priyanka's blog to see her gorgeous line drawings.

The lovely Lexi has let the DT loose in her on-line store again (thanks Lexi!) and this is the card I have made to show to you today:


My card recipe is as follows:
  • Base Card - made from Centura Pearl in Snow White onto which I embossed the largest rosette shape from the "nest" on the Ultimate Pro Embossing Board Springtime Sweets and Cupcake Treats. Having cut this shape out, I then cut, scored and folded the card to make a wavy edged Circular Side Stepper Card. This is only the fourth one of this style that I've made (I made 2 out of thin card to see if I could follow the instructions and I blogged the third card last Saturday) but this tutorial at Splitcoast Stampers makes it very easy!
  • Design Paper - is called Falling Leaves Paper 2, and is part of a kit called "Falling for Fall" by Summer at Summertime Designs. I embossed the largest circle from the nest on my Ultimate Pro Board, cut this out to size around my step, and then fixed it to my base card.
  • Image - This gorgeous youngster is called "Auri" and she is just one of the talented Lexi's (Fairy Dust Crafts) creations - click the link to head over to Lexi's store and have a look at the other lovely digi images she has there! I wanted the image to be large in the circle, so I cropped the image which meant that some grass and flowers have been left off this card - sorry Lexi! To bring this lovely girl to life, I used my Spectrum Noir Pens in the following colours:
    • Skin - FS2, FS3
    • Hair - TN7, TN8
    • Jumper - CR10, CR11
    • Trousers - GB8, GB10, DR3
    • Grass - CG2, DG4
    • Flowers - GB5
    • Shoes - EB8
    • Background - Chalks in Ruddy Red, Yellow Orange, Dark Green and Light Blue, which I've blended to try and get the effect of trees which are changing leaf colour. I'm not sure I've quite managed it.
  • Sentiment - is by Paulette from Create with TLC, and was one of the freebies on her blog last September. Having taken the sentiment into my word processing package, I re-coloured it in a deep red to tone with my papers and colouring of Auri.
  • Button - is actually a faux button which I've made from Acorn 2  in the Summertime Designs kit "Falling for Fall". Having made two 'buttonholes' in it, I then coated it in Glossy Accents, before tying some twine through the holes.

Head on over to Lexi's Creations and see how my talented team-mates and our awesome Guest Designer Mian have used Autumn Colours on their projects, and then come back and share your creation with us! You've got until Saturday 15th September 2012 to link your cards up.
I would like to enter this card into the following challenges, with a little bit of help from the girls at Feline Playful:

Whatever you're doing this week, have fun!

Hugs, Helen x

Monday, 20 August 2012

Back to School

Well, I've got another 2 weeks left before I go back to school (for work purposes you understand!) and my girls don't go back for another couple of days after that. However, it's time for a new challenge at Lexi's Creations and this time Susan has set the challenge of Back to School/College.

As well as letting the DT loose in the store again to pick their favourite image to showcase, the lovely Lexi at Fairy Dust Crafts is sponsoring this time's challenge - you could win 5 digital images of your choice!

So without further ado, here is the card I've made for you today:


My card recipe is as follows:

  • Base Card - made from Centura Pearl in Ivory which I cut, scored and folded into a 15cm square.
  • Design Papers - are called Orange Paper and Stripes, and they are both from the kit "Boy Oh Boy" by Summer at Summertime Designs.
  • Image - This little cutie who looks very smart in his school cap and tie is called Dino Child and it is by Lexi at Fairy Dust Crafts. I used my Spectrum Noir Pens in the following colours to bring this little chap to life:
    • Dino - BT2, BT4 and I added the spots to Lexi's design using BT5
    • Cap & Tie - TN4, EB5
    • Outline - BG1
  • Buttons and Sentiment - are all bottlecap images from the "Boy Oh Boy" kit by Summer at Summertime Designs. I glued 5 layers of each of the numbers and letters together to make mock buttons before mounting them on my card using sticky foam pads. I computer generated the sentiment, superimposing it onto the blank bottlecap that comes with the kit before fussy cutting it out.
Head on over to Lexi's Creations and see what Back to School and/or College creations my creative team-mates have made, and then come back and share your creation with us! You've got until Saturday 1st September 2012 to link your cards up.

I would like to enter this card into the following challenges, with a little bit of help from the girls at Feline Playful
Whatever you're doing this week, have fun!

Hugs, Helen x

Wednesday, 7 September 2011

My First Easel Card - Wedding Acceptance

Hi,

I decided to extend my knowledge and abilities and have made my first easel card. This is the result, together with an envelobox to go with the card. I also wanted this to be a very special card as it is in response to the Wedding Invitation from my brother and his Fiancée. :0) !!!!!!!!!!


Not only was this my first easel card, but it's also the first time I've coloured in a digital stamp and the first time I've used buttons in a project! I decided that because my stamp was tall and narrow my card should reflect this, so it is a slimline card - the finished size of the card when it was folded for posting was fractionally bigger than A5. The card base is ivory and it looks like it has some form of hammered finish to it, but as it has been a long time in my daughters' craft cupboard I've no idea where it came from!

I used the "Springtime Sweets and Cupcake Treats" embossing board with my Ultimate Pro (both from Crafter's Companion) to produce the hearts and ribbon border on the left side of the card. My Top Tip for embossing is to rub some soap at the top of my card (I used a freebie guest soap from the bathroom of the ferry we used to travel to and from France on!) and to run my embossing tool in this - it makes your tool run ohhhhhh soooooo smoothly across the card! :0) I used the same embossing on the left side of the envelobox to tie the project together (unfortunately it hasn't come out too well in the photo above!) :0(

The digital stamp is called "Simply Daisies" by Daisy Doodles, available from The Printable Craft Shop at Card Making World. Having printed this onto my Solar White Neenah Card, I coloured it using my Spectrum Noir Pens (from Crafter's Companion) in the following shades:
Flowers: 12, 14, 11, 1
Stems: 48, 43
Water: 171, 68
Grounding under Vase: CG1
I then cut the stamp out and mounted it onto my card using a 3D glue.

The sentiments on the easel part of the card and on the stopper both came from a Crafter's Companion Member's Monthly Download called Luscious Ladybirds. The circular "Thanks" was already on the download, and additionally there was a blank oval. I imported this oval into my normal word processing package, and superimposed a text box with the font Tempus Sans  to produce the additional wording. I printed these out onto card, cut them out and coloured the edges using my Spectrum Noir in Shade 1 to tie these in to the flowers. These sentiments were mounted using sticky pads. I bought a red organza ribbon, some coir fibre and these delightful handmade ceramic buttons in the shape of a heart from Hobbycraft. I fixed the buttons the ribbon by running the coir fibre under the ribbon, threading it through the holes in the button and then finished it with a bow. I think it gives a lovely "Shaker Style" look to the card, don't you?

I would like to enter this card for the following challenges:
I hope you like this card. Now what am I going to make as a Wedding Card :0∫ !!!!!